My guess is that they're called Z-Moves for the same reason Zygarde was shoved into Alola: XY sequels got canceled, and they wanted to use the letter Z somewhere.Aura Moves would probably fit more considering totem's aura flares to life and the UBs getting auras and so on. I guess they changed them to Z(enith) Moves because it was more marketable (& maybe differeniated itself more from Lucario's aura shtick).
Has anyone translated the differences between move names?

-
Welcome to Smogon! Take a moment to read the Introduction to Smogon for a run-down on everything Smogon, and make sure you take some time to read the global rules.
-
Congrats to the winners of the 2023 Smog Awards!
Gen 7 Development Repository Leak Discussion
- Thread starter Yung Dramps
- Start date

Nothing to do with cassette tapes.FUN FACT: Genesect's "Drives" are actually called cassettes in Japan (which is also what they look like). Yes, the cybernetic enhanced revived super bug uses cassette tapes to alter the Type of its most powerful move.
Just amuses me sounds like they're going going to essentially do the same thing with Silvally but someone pointed out "hey, maybe we should be using modern day technology like compact discs instead of a cartridge". I'm also now imagining instead of a CD player attached to the side of Silvally's head it has a NES/SNES/Sega Genesis slot on its neck.
https://en.wikipedia.org/wiki/Gene_cassette


Huh, well I guess that is reason they went with cassettes. Though I do want to make a correction, it's not cassette tapes they look like but rather floppy discs (though not so floppy):

So we're both half right. They probably got the name for gene cassette, but their designs is still based on older technology (and who knows, maybe their thickness is because they're sort of a combination of floppy discs and cassette tapes).
Some more stuff:
- Remember how your house has a garage but it's either closes or blocked off by your parent's car? Well turns out there is a room for not only it and what looks to be a bathroom. Also here's a toilet.
- The Red Trainer has a walking animation (after being transferred into ORAS) and an animation of him giving a command had also been found.
- More palette swaps of the Red trainer.
- Red wasn't the only past trainer recreated. Two models of Hilda have also been found, one is a normal proportioned model and the other is a chibi version like the overworld models from Gen VI.
- BTW, wondering where those Hilda models are? There in Vanville Town, for some reason a model of that is in the game.
- More map stuff. Top Down view of the simplified Tide Song Hotel, revealing no entrance to the beach. Also there's this bigger map of the area revealing that on this beta map many locations on Akala Island were closer together.
- And finally this is how they figure out what form of Vivillion your Spewpa should evolve into. And here are the associated textures. Someone made how the numbers fall on a map.

He theorizes that BW2 was tested on 3DS but I think he's missing the mark. I could see it as: XY was being developed after BW1 wrapped up, and they whipped up some Hilda models to test things out (maybe also testing how they wanted models to look so a high res and a chibi). Vaniville & Hilda are remnants of earlier XY builds that just made it into the gen 7 development assets.
James Turner had said on Twitter that the he made the gamefreak logo for Black/White, and that it was originally made to be shown on the 3ds. That could be a one-off thing, but that does imply that BW was planned for the 3ds at one point.
Huh, missed all this last month.
I find it cute that the entire concept of Passimian is based on a pun. Its codename is Huttosaru, or Futsal transliterated into Japanese, but it also contains Saru, Japanese for monkey.
I guess this also implies that Passimian went through some design changes before release? Because the final Passimian design is more based on American football than futsal.
breh
強いだね
Super late on this thread, but some comments:
- Cutiefly is "Gadfly", not the bee fly it takes its inspiration from.
- Wishiwashi is "Weak", lol.
- Passimian is "Futsal", finally confirming what sport it's playing... yeah, I never heard of it either.
- Type: Null's is a bit confusing. In Japanese it's "Guripusu". Eclipse_tt relates it to a Gundum and Yu-Gi-Oh monster which name is "Gryps". After a quick check, I found a more simple translation: "Griffin". Makes sense, it is a chimera-like monster.
- Now we already discussed the codenames for the original Ultra Beasts (though their actual codenames one uses the first letter of the word instead of the whole word), but apparently the Ultra Beasts added in USUM also had a theme to their first letters of their Japanese name. Poipole was "Doku" ("Poison"), Stakataka was "Ishigaki" ("Stone Wall"), and Blacephalon was "Hanabi" ("Fireworks"). If you put the first letters of their Japanese backwards (BTW the "Ish" in "Ishigaki" counts as an "s") to get HSD: Hue, Saturation, & Darkness.

Cutiefly's codename is abu; beeflies are referred to as ツリアブ (tsuri-abu); it is a beefly and this is a poor translation
Wishiwashi's final name is actually "Yowashi", so I guess they had this one planned out for well in advance or the name stuck.
Passimian being based on Futsal (Futtosaru) is relevant as it is also a monkey (saru). Things like this can be erased via translation (see: Salsa in Mother 3) (e: lol this is what I get for not reading all the posts before posting, as I was evidently not the only one to notice)
The word for Griffon is spelled differently, kind of (codename as "Guripusu" would be グリプス, but Gryps / γρύψ / "Guryupusu" (per Japanese dictionaries) is グリュプス), but I do not think it is out of the realm of possibility for a Japanese company to make an error in internal code comments about how to spell a word derived from greek
The S in stakataka's codename is probably from "stone wall" if you weren't implying that

So what are the chances having the code in hand would help people with rom hacks? I really want a way to skip cutscenes.


Ultra Wormhole Mechanics
You have an energy gauge that starts at 70, out of a maximum of 100. This gauge decays by 1 point every 12 frames (based on a framerate of 30fps, so 0.4 seconds). Collecting an energy refill adds 10 points to the gauge, and hitting an electric orb (referred to internally as an "obstacle") subtracts 20. If you would collect energy to go over the maximum, you get to increase the maximum by 20, but only five times: once you get the maximum gauge up to 200, it's fixed there for the remainder of the ride. Attempting to gain more than that just leaves you capped out at 200. A rule of thumb is that if you count off 4 seconds between one energy refill and the next, you're breaking even; in order to gain energy you have to run into them at a rate faster than once every 4 seconds (and avoid obstacles), which becomes less likely as you go deeper and the refills become less frequent (more on that later).
If your energy meter is empty, your forward speed is only 42% of what it would be at full, and maneuvering yourself in any direction can only be done at one-seventh the speed of a fully energized Solgaleo or Lunala (which is obviously weaker than the gravitational pull exerted by portals). Note that "full" is relative to your current maximum, so 200/200 doesn't make you move any faster than 100/100 (nor does 0/200 move any slower than 0/100), it just means the decay rate takes longer to completely drain the gauge.
The units used in the wormhole, while flavorfully described in-game as "light-years", are internally referred in developer comments as meters (in fact, the unit scale is really in terms of centimeters then scaled down by a factor of 100 later) which is obviously more plausible with respect to the scale everything is drawn at.
The process of placing stuff in the tunnel, meanwhile, is achieved by breaking it up into 15-meter-deep segments. The first segment comes at 50m (it's not possible for anything to be placed sooner than that point), the second segment starts at 65m, the third at 80, and so on. Initially, all the segments up to a depth of 290m are loaded (the only things that can be placed during these segments are energy refills). The next loading zone happens when the player reaches a distance of 155, causing the segment at 305 to load, and from then on every 15m depth causes the segment 150m ahead of the player to load so that there's reasonable lead-in time to react to the stuff that gets generated.
Each segment can generate up to four objects to be placed, though the object won't always be placed within the segment to which it's attributed. There's a "fudge region" where it's randomly placed in any one of the next four segments, by adding a depth that can range from 0-60m.
Where the odds are marked as a linear gradient, the endpoints it's actually interpolating from are 300-600 and 600-1000. So the 305 segment has 79.33% chance to place an energy refill, 320 has 77.33%, 680 has 26% chance to place an obstacle, and so on.
The segments shortly after multiples of 500 between 2000 and 5000 are marked as 200% odds of obstacle; what this really means is a "guarantee" that two separate obstacles will be placed in each segment allotment (so two that can end up in 2000-2059, then separately another two that can end up in 2015-2074...and on to the 2090-2149 range). These "storms" of 12-14 obstacles in rapid succession are thus an entirely deliberate consequence of the way they've set these odds up, and can be used as a reliable barometer of how far along you are as you're flying through the tunnel and watching your surroundings. Other consequences of this system are that no portal of any kind can appear earlier than a distance of 605, and that energy refills are completely nonexistent once you reach 5150--after that point, all you can do is trudge on with your remaining, monotonically decreasing energy until it runs out, and hope that you find a desired portal in the mean time.
When the game is placing energy refills or obstacles, it uses a rectangular coordinate system: picture a square with an inscribed circle. Pick a random point within the square, then if that point is also within the circle, that's a good point and will be placed at whatever depth was randomly chosen. If not, try again with another random point. If the game generates 10 random points and all of them fall outside the circle (this has a minuscule chance of happening, worse than missing Lovely Kiss 11 times in a row), then it gives up and places it at the dead center of the tunnel's cross section, wherever that may be as it winds through space.
On the other hand, portals are generated using polar coordinates: imagine the tunnel as a roll of cookie dough, and you slice it up into cookies to represent the segments, then you take a cookie and divide it into four concentric rings of equal width, like an archery target. Then a random point that's guaranteed to be in the outermost ring is chosen as the center-point of the portal. EXCEPTION: If you're still trying to get to Ultra Megalopolis for the first time, white portals will always be placed right at the center of the bulls-eye.
In any event, there are checks to make sure that a newly spawned object isn't "too close" to another currently loaded object. If an object is chosen for a spawn location that's within a specified minimum radius, the object simply won't spawn at all (so the "guaranteed" storms of obstacles won't always generate the full 12-14 as scheduled, some of them might get caught up in the understandably crowded tunnel). There are further checks with regard to two portals being too close: if the cross-sectional projection of a newly scheduled portal's center is within 0.5% of the width of the circle compared to that of any other currently loaded portal, or if the scheduled depth is within 40m of any other portal regardless of how spaced out their projections are on the cross-section, that's considered "too close" and the portal won't spawn, significantly reducing their effective spawn rate compared to the nominal average rate of one per three segments.
If a portal does spawn, it has to receive a color and rarity. 4% of all portals are white (leading to Ultra Beast worlds), and the rest are divided evenly as 24% to each color. Here again there's a difference when you're playing in story mode and just looking for Ultra Megalopolis: the first time through you get those normal odds, but if you end up hitting a different color instead, you'll have to go back for a second trip (after optionally getting a chance to KO or catch the Pokemon you found there, of course) and on that trip the white portal odds increase to 16%, leaving 21% for each of the other colors. Continued misses will increase the odds further to 32% on the third trip, 44% on the fourth, and finally 100% on the fifth to guarantee that your ride has no choice but to come out in the right destination.
As opposed to color, the rarities of each portal were already datamined a long time back. As a refresher (yes, the odds here reach their final step at 4500, not 5000):
It's worth noting that the odds of portal rarities are set based on the beginning of the segment it was spawned from, even though the variable depth may push it back to a later point. So when segment 2495 gets loaded, it can summon a portal past the 2500 mark, but if it does so, there's no chance for that portal to show up with the "bloom" overlay in addition to the two rings.
On the contrary, what you'll find in Ultra Space isn't determined until you get sucked in, and is based on the actual depth the portal was placed at. For white portals, this roll determines which world you'll be spat out into, while for other colors it controls which Pokemon is set to appear and, if it's not legendary, whether it will be forced shiny or locked out of that. So in the previous example, a spawn from the 2495 segment that gets placed after the 2500 mark, you would get the uptick in odds (for legend/shiny) that goes with crossing 2500. Those tables have also been datamined before, but here they are again for posterity:
0-Ring Odds
1-Ring Odds
2-Ring Odds
Bloom Odds
You have an energy gauge that starts at 70, out of a maximum of 100. This gauge decays by 1 point every 12 frames (based on a framerate of 30fps, so 0.4 seconds). Collecting an energy refill adds 10 points to the gauge, and hitting an electric orb (referred to internally as an "obstacle") subtracts 20. If you would collect energy to go over the maximum, you get to increase the maximum by 20, but only five times: once you get the maximum gauge up to 200, it's fixed there for the remainder of the ride. Attempting to gain more than that just leaves you capped out at 200. A rule of thumb is that if you count off 4 seconds between one energy refill and the next, you're breaking even; in order to gain energy you have to run into them at a rate faster than once every 4 seconds (and avoid obstacles), which becomes less likely as you go deeper and the refills become less frequent (more on that later).
If your energy meter is empty, your forward speed is only 42% of what it would be at full, and maneuvering yourself in any direction can only be done at one-seventh the speed of a fully energized Solgaleo or Lunala (which is obviously weaker than the gravitational pull exerted by portals). Note that "full" is relative to your current maximum, so 200/200 doesn't make you move any faster than 100/100 (nor does 0/200 move any slower than 0/100), it just means the decay rate takes longer to completely drain the gauge.
The units used in the wormhole, while flavorfully described in-game as "light-years", are internally referred in developer comments as meters (in fact, the unit scale is really in terms of centimeters then scaled down by a factor of 100 later) which is obviously more plausible with respect to the scale everything is drawn at.
The process of placing stuff in the tunnel, meanwhile, is achieved by breaking it up into 15-meter-deep segments. The first segment comes at 50m (it's not possible for anything to be placed sooner than that point), the second segment starts at 65m, the third at 80, and so on. Initially, all the segments up to a depth of 290m are loaded (the only things that can be placed during these segments are energy refills). The next loading zone happens when the player reaches a distance of 155, causing the segment at 305 to load, and from then on every 15m depth causes the segment 150m ahead of the player to load so that there's reasonable lead-in time to react to the stuff that gets generated.
Each segment can generate up to four objects to be placed, though the object won't always be placed within the segment to which it's attributed. There's a "fudge region" where it's randomly placed in any one of the next four segments, by adding a depth that can range from 0-60m.
| Distance | Odds of Energy | Odds of Obstacle | Odds of Portal |
| 50-290 | 80% | 0% | 0% |
| 305-590 | linear 80%→40% | 20% | 0% |
| 605-995 | linear 40%→30% | linear 25%→30% | 33.3% |
| 1010-1490 | 30% | 35% | 33.3% |
| 1505-1985 | 25% | 40% | 33.3% |
| 2000-2090 | 20% | 200% | 33.3% |
| 2105-2495 | 20% | 45% | 33.3% |
| 2510-2585 | 20% | 200% | 33.3% |
| 2600-2990 | 15% | 50% | 33.3% |
| 3005-3095 | 12.5% | 200% | 33.3% |
| 3110-3485 | 12.5% | 55% | 33.3% |
| 3500-3590 | 10% | 200% | 33.3% |
| 3605-3995 | 10% | 60% | 33.3% |
| 4010-4085 | 7.5% | 200% | 33.3% |
| 4100-4490 | 7.5% | 65% | 33.3% |
| 4505-4595 | 5% | 200% | 33.3% |
| 4610-4985 | 5% | 70% | 33.3% |
| 5000-5090 | 5% | 200% | 33.3% |
| 5105+ | 0% | 75% | 33.3% |
Where the odds are marked as a linear gradient, the endpoints it's actually interpolating from are 300-600 and 600-1000. So the 305 segment has 79.33% chance to place an energy refill, 320 has 77.33%, 680 has 26% chance to place an obstacle, and so on.
The segments shortly after multiples of 500 between 2000 and 5000 are marked as 200% odds of obstacle; what this really means is a "guarantee" that two separate obstacles will be placed in each segment allotment (so two that can end up in 2000-2059, then separately another two that can end up in 2015-2074...and on to the 2090-2149 range). These "storms" of 12-14 obstacles in rapid succession are thus an entirely deliberate consequence of the way they've set these odds up, and can be used as a reliable barometer of how far along you are as you're flying through the tunnel and watching your surroundings. Other consequences of this system are that no portal of any kind can appear earlier than a distance of 605, and that energy refills are completely nonexistent once you reach 5150--after that point, all you can do is trudge on with your remaining, monotonically decreasing energy until it runs out, and hope that you find a desired portal in the mean time.
When the game is placing energy refills or obstacles, it uses a rectangular coordinate system: picture a square with an inscribed circle. Pick a random point within the square, then if that point is also within the circle, that's a good point and will be placed at whatever depth was randomly chosen. If not, try again with another random point. If the game generates 10 random points and all of them fall outside the circle (this has a minuscule chance of happening, worse than missing Lovely Kiss 11 times in a row), then it gives up and places it at the dead center of the tunnel's cross section, wherever that may be as it winds through space.
On the other hand, portals are generated using polar coordinates: imagine the tunnel as a roll of cookie dough, and you slice it up into cookies to represent the segments, then you take a cookie and divide it into four concentric rings of equal width, like an archery target. Then a random point that's guaranteed to be in the outermost ring is chosen as the center-point of the portal. EXCEPTION: If you're still trying to get to Ultra Megalopolis for the first time, white portals will always be placed right at the center of the bulls-eye.
In any event, there are checks to make sure that a newly spawned object isn't "too close" to another currently loaded object. If an object is chosen for a spawn location that's within a specified minimum radius, the object simply won't spawn at all (so the "guaranteed" storms of obstacles won't always generate the full 12-14 as scheduled, some of them might get caught up in the understandably crowded tunnel). There are further checks with regard to two portals being too close: if the cross-sectional projection of a newly scheduled portal's center is within 0.5% of the width of the circle compared to that of any other currently loaded portal, or if the scheduled depth is within 40m of any other portal regardless of how spaced out their projections are on the cross-section, that's considered "too close" and the portal won't spawn, significantly reducing their effective spawn rate compared to the nominal average rate of one per three segments.
If a portal does spawn, it has to receive a color and rarity. 4% of all portals are white (leading to Ultra Beast worlds), and the rest are divided evenly as 24% to each color. Here again there's a difference when you're playing in story mode and just looking for Ultra Megalopolis: the first time through you get those normal odds, but if you end up hitting a different color instead, you'll have to go back for a second trip (after optionally getting a chance to KO or catch the Pokemon you found there, of course) and on that trip the white portal odds increase to 16%, leaving 21% for each of the other colors. Continued misses will increase the odds further to 32% on the third trip, 44% on the fourth, and finally 100% on the fifth to guarantee that your ride has no choice but to come out in the right destination.
As opposed to color, the rarities of each portal were already datamined a long time back. As a refresher (yes, the odds here reach their final step at 4500, not 5000):
| Distance | 0-Ring Odds | 1-Ring Odds | 2-Ring Odds | Bloom Odds |
| 605-995 | 100% | 0% | 0% | 0% |
| 1010-1490 | 78% | 20% | 2% | 0% |
| 1505-1985 | 66% | 30% | 4% | 0% |
| 2000-2495 | 52% | 40% | 8% | 0% |
| 2510-2990 | 33% | 50% | 16% | 1% |
| 3005-3485 | 32% | 50% | 16% | 2% |
| 3500-3995 | 31% | 50% | 16% | 3% |
| 4010-4490 | 30% | 50% | 16% | 4% |
| 4505+ | 29% | 50% | 16% | 5% |
On the contrary, what you'll find in Ultra Space isn't determined until you get sucked in, and is based on the actual depth the portal was placed at. For white portals, this roll determines which world you'll be spat out into, while for other colors it controls which Pokemon is set to appear and, if it's not legendary, whether it will be forced shiny or locked out of that. So in the previous example, a spawn from the 2495 segment that gets placed after the 2500 mark, you would get the uptick in odds (for legend/shiny) that goes with crossing 2500. Those tables have also been datamined before, but here they are again for posterity:
0-Ring Odds
UB | Portals | Non-UB | Portals | ||||
| Distance | Nihilego | Buzzwole/Pheromosa | Xurkitree | Kartana/Celesteela | Guzzlord | Legendary | Shiny (if nonlegendary) |
| 605-999 | 60% | 35% | 2% | 2% | 1% | 3% | 1% |
| 1000-1499 | 54% | 39% | 4% | 2% | 1% | 3% | 1% |
| 1500-1999 | 48% | 43% | 6% | 2% | 1% | 3% | 1% |
| 2000-2499 | 42% | 47% | 8% | 2% | 1% | 3% | 1% |
| 2500-2999 | 36% | 51% | 10% | 2% | 1% | 3% | 1% |
| 3000-3499 | 30% | 55% | 12% | 2% | 1% | 3% | 1% |
| 3500-3999 | 24% | 59% | 14% | 2% | 1% | 3% | 1% |
| 4000-4499 | 18% | 63% | 16% | 2% | 1% | 3% | 1% |
| 4500-4999 | 12% | 67% | 18% | 2% | 1% | 3% | 1% |
| 5000+ | 6% | 71% | 20% | 2% | 1% | 3% | 1% |
1-Ring Odds
UB | Portals | Non-UB | Portals | ||||
| Distance | Nihilego | Buzzwole/Pheromosa | Xurkitree | Kartana/Celesteela | Guzzlord | Legendary | Shiny (if nonlegendary) |
| 1000-1499 | 2% | 54% | 39% | 4% | 1% | 4% | 2% |
| 1500-1999 | 2% | 48% | 43% | 6% | 1% | 5% | 3% |
| 2000-2499 | 2% | 42% | 47% | 8% | 1% | 6% | 4% |
| 2500-2999 | 2% | 36% | 51% | 10% | 1% | 7% | 5% |
| 3000-3499 | 2% | 30% | 55% | 12% | 1% | 8% | 6% |
| 3500-3999 | 2% | 24% | 59% | 14% | 1% | 9% | 7% |
| 4000-4499 | 2% | 18% | 63% | 16% | 1% | 10% | 8% |
| 4500-4999 | 2% | 12% | 67% | 18% | 1% | 11% | 9% |
| 5000+ | 2% | 6% | 71% | 20% | 1% | 12% | 10% |
2-Ring Odds
UB | Portals | Non-UB | Portals | ||||
| Distance | Nihilego | Buzzwole/Pheromosa | Xurkitree | Kartana/Celesteela | Guzzlord | Legendary | Shiny (if nonlegendary) |
| 1000-1499 | 0% | 2% | 54% | 39% | 5% | 10% | 3% |
| 1500-1999 | 0% | 2% | 48% | 43% | 7% | 13% | 5% |
| 2000-2499 | 0% | 2% | 42% | 47% | 9% | 16% | 7% |
| 2500-2999 | 0% | 2% | 36% | 51% | 11% | 19% | 9% |
| 3000-3499 | 0% | 2% | 30% | 55% | 13% | 22% | 11% |
| 3500-3999 | 0% | 2% | 24% | 59% | 15% | 25% | 13% |
| 4000-4499 | 0% | 2% | 18% | 63% | 17% | 28% | 15% |
| 4500-4999 | 0% | 2% | 12% | 67% | 19% | 31% | 17% |
| 5000+ | 0% | 2% | 6% | 71% | 21% | 34% | 19% |
Bloom Odds
UB | Portals | Non-UB | Portals | ||||
| Distance | Nihilego | Buzzwole/Pheromosa | Xurkitree | Kartana/Celesteela | Guzzlord | Legendary | Shiny (if nonlegendary) |
| 2500-2999 | 0% | 0% | 0% | 40% | 60% | 100% | 16% |
| 3000-3499 | 0% | 0% | 0% | 34% | 66% | 100% | 20% |
| 3500-3999 | 0% | 0% | 0% | 28% | 72% | 100% | 24% |
| 4000-4499 | 0% | 0% | 0% | 22% | 78% | 100% | 28% |
| 4500-4999 | 0% | 0% | 0% | 16% | 84% | 100% | 32% |
| 5000+ | 0% | 0% | 0% | 10% | 90% | 100% | 36% |
Last edited:
When you let the mathematician member of your staff have a bit too much fun making a game mechanic...Ultra Wormhole Mechanics
(snip)
I still stand by my opinion the Ultra Space Ride has way too many factors. Looking at all this, I think the Ring Rarity could be easily scrapped. Just make how good the portal is based on distance alone.
What? And make it deterministic?I still stand by my opinion the Ultra Space Ride has way too many factors. Looking at all this, I think the Ring Rarity could be easily scrapped. Just make how good the portal is based on distance alone.
It's Game Freak who we are talking about. They won't do such a thing.
You forgot about them defaulting to motion controls.I feel like that's how most games would probably handle something like this so I'm not going to hold gamefreak to the coals on anything other than "you made blooms HOW rare?"

At least there was a way to change it to traditional controls at all. I mean, I'll give that it's hidden with no hints whatsoever, but at least it exists.You forgot about them defaulting to motion controls.
Also finding out about the controls is pretty easy anyways, we are in the information age, a simple check on your favorite search engine(Or complaining about the motion controls on your favorite Pokemon board as is often the case) can make you quickly learn that you can do so from other people.

Here's a Z-mechanic that came and went during development of SM.
(EDIT: Added details to the post that were only in code screenshots, replaced code screenshots, and added references to each git commit.)
tl;dr: Z-moves once needed to be charged outside of battle before being used. This probably would not have affected competitive.
In October 8, 2015 there was data about a zenryoku/"Z" power gauge (パワーゲージ) added to the save data. It had a maximum capacity of 7. (ca70fa5756) (prog/savedata/include/mystatus.h)
It seems like you would need to raise your power gauge to full before being able to use a Z-move, instead of being able to use them whenever like in final. (558c281c95)
Using a Z-move would fully deplete it, winning battles would add +1 and capturing a pokemon would add +3, with some other activities raising it to max like eating at the pokemon centre cafe, or the malasada restaurant, or whatever "MINIPOKE" is. (ミニポケ効果) I am really not sure what this could be. Maybe Poke Pelago because of the small sprites, but that doesn't have much in common with the others. I thought about the overworld mons and the photo club but those are from USUM. (3ff17632cc)
This gauge did not last very long. In November 5 2015, the battle related functions were removed, and all references to the battle gauge ended up completely removed on December 4, 2015. (522eee7eb2)
Last edited:
Late but probably low, since this repository is notably missing most if not all data related to text, graphics, and stats. At least it has plenty of mechanics.So what are the chances having the code in hand would help people with rom hacks? I really want a way to skip cutscenes.
In addition to my last post about z-power, it turns out that the Z-ring would've had an actual use once. It had its own menu screen, first added in October 13, 2015 (166c185ef7). Most of the work on this menu was done by Koji Kawada, responsible for UI Systems Programming according to the credits. There's not much graphically or mechanically to go off of, but it's safe to say this was the original way to interact with z-crystals/"beads". Your party and crystals would be displayed on the bottom screen, sorted in normal and "rare" categories (probably unique crystals), with L and R to switch pages. It would also show your current z power gauge status (through the ring) on the top screen, with 4 messages for the possible states (0 power, 1-4 power, 5-6 power, max 7 with an animation). There would also be a demo of some kind, though there's nothing to show for it by the time this menu got removed. Speaking of removal, there were 10 rare crystals at the point this was removed, though there are 11 unique Z-crystals in the final game. Based on the item order, Pikashunium Z was probably the last addition.
These are some message variables without text but with comments about their purpose, and based on machine translation they're mostly what I'd expect from an item menu.power message comments said:zen_ring_02_01, // からっぽ
zen_ring_02_02, // まだまだ
zen_ring_02_03, // あとすこし
zen_ring_02_04, // まんたん
// zen_ring_01_01 どうぐめい ゼンリョクビーズ名
zen_ring_05_01, // こうかあり
zen_ring_05_02, // さずけている
zen_ring_05_03, // こうかなし
// メッセージ系
// zen_ring_06_01 もってるよ 0=ニックネーム、1=もってるどうぐ、2=ビーズ名
// zen_ring_07_01 おぼえてないよ
// zen_ring_08_01 ピース名piece
// zen_ring_yes
// zen_ring_no
There's some special checks for Giratina because it could possibly switch formes when changing items, and this is a comment about checking for shininess (but not needing to since minisprites don't have shiny palettes). Apparently someone considered adding sparkles to the minisprite icons here.// レアのポケモンアイコンはないので、レアは気にしなくていい。 // @todo レアのキラキラは付けるか?
In the end, this menu was removed on March 17, 2016 (05b04b781d), but the last commit about it in this repo was in December 4, 2015 to remove a reference to the gauge. (40cc0529fa?) The Z-ring was reduced to a useless key item (that got replaced in USUM) and physical toy, while Z-crystals would just be infinite generators right from the bag.
A Snorlax Alolan form was removed in November 11, 2015, though there's no other information on it. The only mention is a listing in the pokedex save data, along with every other mon that had some sort of form. (savedata/source/zukansave.cpp)
MID-EDIT: It is also mentioned in this table of alolan forms that I didn't notice at first.
EDIT: Also there isn't an entry for Diglett/Dugtrio yet.
(//niji追加アローラ地方の姿)
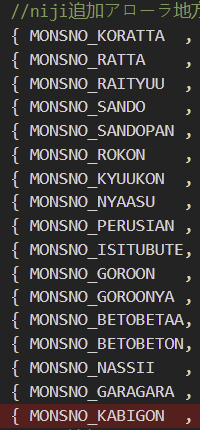
This is the commit message:
In the same file, it can be noticed that "Maborosi 18" and Cosplay Pikachu were removed on February 5, 2016. The former is Zeraora's codename in USUM, though there's no sign of its existence other than the commit message as far as I can tell.
A menu customizer(?) was removed on December 25 2015 (e5ff42d16f). Based on the comments it seemed there would be a way to add/remove menu icons or choose themes that could change the wallpaper/icons.
Gamefreak calls friendship/happiness "familiarity" and affection "friendship" in their english variables.
They changed the shiny ratio in XY to 1/4096, and now we can see that it happened on 2013 April 23 thanks to a comment.
Kurt balls were made holdable in June 7 2016 (669ad18c), though the Sport and Park Balls were left unholdable.
MID-EDIT: It is also mentioned in this table of alolan forms that I didn't notice at first.
EDIT: Also there isn't an entry for Diglett/Dugtrio yet.
(//niji追加アローラ地方の姿)
This is the commit message:
In the end Snorlax did get away with an exclusive Z-move and gigantamax form, so I'd say it still managed pretty well.c7a3a51e93 said:[fix] カビゴンのフォルムがなくなったことに対応。
In the same file, it can be noticed that "Maborosi 18" and Cosplay Pikachu were removed on February 5, 2016. The former is Zeraora's codename in USUM, though there's no sign of its existence other than the commit message as far as I can tell.
Unfortunately most of these resource files got moved to "conv_header"/out of git early on, and while they were tracked before that, the files just represent final Gen 6. As a side note, 32ec17c1bfe/Aug 2015 is when the AI scripts got moved.5abed77e8a said:[modify] マボロシ18、お着替えピカチュウ削除に対する対応
A menu customizer(?) was removed on December 25 2015 (e5ff42d16f). Based on the comments it seemed there would be a way to add/remove menu icons or choose themes that could change the wallpaper/icons.
Other observations:placeholder message comments said:// かべがみの テーマを えらぶ
// アイコンを ひょうじ しない
// アイコンを ひょうじ する
// アイコンの いちを もどす
// はい
// いいえ
// メニューを カスタマイズ できます!
// アイコンを みえなくします
// アイコンを みえなくしました
// アイコンを みえるように します
// アイコンを みえるように しました
// アイコンの いちを もとに もどします
// アイコンの いちを もとに もどしました
// テーマを えらぶと かべがみや アイコンの えが かわります!
Gamefreak calls friendship/happiness "familiarity" and affection "friendship" in their english variables.
They changed the shiny ratio in XY to 1/4096, and now we can see that it happened on 2013 April 23 thanks to a comment.
The z-crystals were called orbs originally (June 11 2015/ffea13e3), starting with the basic types and Pikachu, which reflects their internal order. They were changed to 'pieces' in October 9 2015, and were later split into 'beads' in November 4 2015, which I guess are the small held versions. (1502275ce5, 920b6145c7)pml_PokemonParamCalcTool.cpp said:// 2013.04.23 1/8192→1/4096 の確率に変更
Kurt balls were made holdable in June 7 2016 (669ad18c), though the Sport and Park Balls were left unholdable.
Last edited:
Yung Dramps
awesome gaming
This theory also provides a potential explanation for why it might've been axed: A fat Fighting type Sumo Pokemon with HP as its highest stat may have been too conceptually similar to Hariyama who is already in the Alola dex and on Hala's teamIn the final game Snorlax (or, rather, Munchlax) is only available on Melemele and considering Hala's sumo aesthetic I wonder if Snorlax might've been considered for Hala's team and been a sumo-based Fighting type during the brief period it was on the table.
There was another removed SM feature called "Pokedeco"/(ポケデコ), with the first mention being on May 15 2015 (01e4b846) and more work in June. Naoya Uematsu (Pokémon Drawing Programming credits) has a lot of related commits. It had flags involving when to display models and a lot of commits related to model viewers, so my guess is that it would be a Pokemon accessory/customization feature, though there's not really a lot to talk about without the actual assets.
Game Freak's model viewer code (tool_project/ModelViewer/project/PokemonModelDataManager.cs) suggests categories of hat/ribbon/glasses/chest/badge, though the chest category was removed in 45569e05, but ribbons and badges were still counted under the "all chest parts" category so it may have been for simplification.
Some code in btlv_object_poke.cpp used to set a useDeco flag on only if the pokemon was Pikachu though, but it could be just for testing since this was later commented out 2 weeks before the flag was ultimately removed on September 28 2015 (7f2cc86e8). Some pokemon structure code was added and commented out on September 16 (14f0a23366), which was probably because it was in the middle of a whole restructure. At this point in time the hyper training mechanics were added. Apparently there was a bit in the data structure that was meant to store the terrain a pokemon was captured on, but XY never used it.
Despite the early removal, there are actually a few remaining references to this feature in the source code. pokedeco actually still has a part in the data structure between egg moves and IVs (pml_PokemonParamLocal.h) and a variable in battle_SetupParam.h. There are a couple pokedeco sound labels (pokedeco, in, and out) in SoundMiddleID.h right around after-battle care/refresh and Amie sound effects with a similar prefix, so the feature's menus would probably be in Pokemon Refresh.
In the end, another feature would be internally referred to as deco/decoration, the USUM Alola Photo Club editing features. There's not really a connection outside of names, though it has a similar use in giving you a bunch of glasses and a few ribbon stamps to dress up.
There is a catch rate modifier that decreases the capture chance depending on your dex completion if set, as detailed in https://www.dragonflycave.com/mechanics/gen-vi-vii-capturing. In BW it was known that this was used in dark grass, but in Gen 6/7 it wasn't clear. Well in battle_SetupParam.h, there is a flag called BTL_STATUS_FLAG_HIGH_LV_ENC, which has a comment about the BW mechanic and does apply the different catch rate modifier when set. (btl_ServerFlowSub.cpp)
More miscellaneous:
Badge count for following orders was removed on December 4 2015 (5f7cf80d98) in favour of stamps and levels. At this point they had already decided on what would be the final obedience levels per number of stamps (20, 35, 50, 65, 80, and max level at "5").
The Ultra Beast and Lusamine boss flags were added in Jan 7 2016 (a238ec6359), and Ultra Beast AI is supposed to be smarter. Someone noticed this on the Bulbapedia talk page at the time.
Some old gen 6 flags (rival mega ring, deoxys, birch) were removed and poke ride costume flags (rideware_land and sky) were added in Jan 22 2016. (8f04ab631) The sky flag got turned into the swim flag later on the same day.
Aether Paradise is called "POKE_SANCTUARY" for its no ball throwing flag, added in Feb 2 2016 (2c01edf1).
On Apr 1 2016 (5c7ff611) a flag for Nihilego's turn 5 flee was added with a comment about it apparently being strong. I guess gamefreak didn't want to add a mandatory story boss that would be too strong for a player to beat.
Stumbling when you walk and press B a lot was added on Feb 22 2016. (8b979e91)
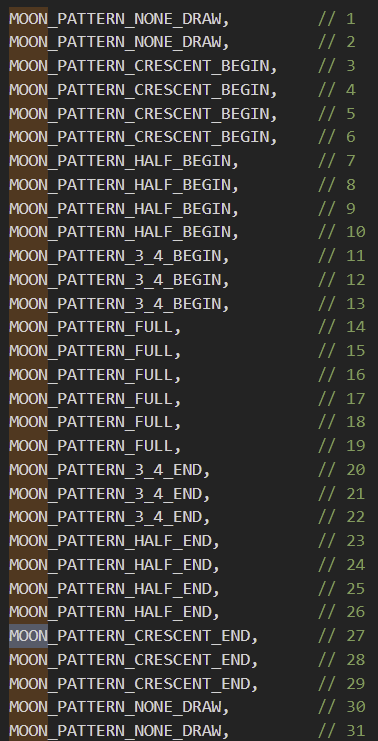
The game has a full set of lunar phases for a month's 31 days, added to skybox code on Sep 10 2015 (b6db53a2e), which also mentioned sun positions.
Out-of-battle move functionality was removed on Aug 18 2015. (80565b510)
The bike/fly/dowsing flags were renamed to pokeride ones on Jun 22 2015. (de50ee16ad)
Game Freak's model viewer code (tool_project/ModelViewer/project/PokemonModelDataManager.cs) suggests categories of hat/ribbon/glasses/chest/badge, though the chest category was removed in 45569e05, but ribbons and badges were still counted under the "all chest parts" category so it may have been for simplification.
Some model handling files for pokedeco (Jul 30 2015) were removed on October 2 2015. (ed74dfedd) One file had a struct called PokeDecoParamData which had the entries idNum, orderNumber, ownerPokemon, partType, seriesType, imageType, happyEffect, rareRank, and releasePatchVersion, but not much else was in the file. The last mention of pokedeco would be on Jan 15 2016 (ade88d36), which removed deco/icon code from the dressup menu.descriptions from a rendering engine file said:BB_HAT //!< @brief 帽子型チャーム(頭部)
BB_RIBBON //!< @brief リボンチャーム(胸部)
BB_GLASSES //!< @brief メガネ(顔)
BB_BADGE //!< @brief ステータス系(バッジ, リボン)(胸部)
Some code in btlv_object_poke.cpp used to set a useDeco flag on only if the pokemon was Pikachu though, but it could be just for testing since this was later commented out 2 weeks before the flag was ultimately removed on September 28 2015 (7f2cc86e8). Some pokemon structure code was added and commented out on September 16 (14f0a23366), which was probably because it was in the middle of a whole restructure. At this point in time the hyper training mechanics were added. Apparently there was a bit in the data structure that was meant to store the terrain a pokemon was captured on, but XY never used it.
Despite the early removal, there are actually a few remaining references to this feature in the source code. pokedeco actually still has a part in the data structure between egg moves and IVs (pml_PokemonParamLocal.h) and a variable in battle_SetupParam.h. There are a couple pokedeco sound labels (pokedeco, in, and out) in SoundMiddleID.h right around after-battle care/refresh and Amie sound effects with a similar prefix, so the feature's menus would probably be in Pokemon Refresh.
In the end, another feature would be internally referred to as deco/decoration, the USUM Alola Photo Club editing features. There's not really a connection outside of names, though it has a similar use in giving you a bunch of glasses and a few ribbon stamps to dress up.
There is a catch rate modifier that decreases the capture chance depending on your dex completion if set, as detailed in https://www.dragonflycave.com/mechanics/gen-vi-vii-capturing. In BW it was known that this was used in dark grass, but in Gen 6/7 it wasn't clear. Well in battle_SetupParam.h, there is a flag called BTL_STATUS_FLAG_HIGH_LV_ENC, which has a comment about the BW mechanic and does apply the different catch rate modifier when set. (btl_ServerFlowSub.cpp)
Judging by the name this would make it harder to catch higher level encounters. However, I did not find any references to this flag actually being set, and so it might be that gamefreak just never got around to implementing this in the 3DS games, or it's just not handled in this repository's code. If this concept sounds familiar, that's because it was in Gen 8 and very noticeable because of the Wild Area. I can't confirm this myself but this could be the way Gen 8 catch rates are affected for higher level encounters.///< ハイレベルエンカウントならTRUE(図鑑の埋まり方に比例して捕獲率が変動/BW世代の濃い草むら用だがバトルで実装済み)
More miscellaneous:
Badge count for following orders was removed on December 4 2015 (5f7cf80d98) in favour of stamps and levels. At this point they had already decided on what would be the final obedience levels per number of stamps (20, 35, 50, 65, 80, and max level at "5").
There is a flag called VS_NUSI used for totem battles, added in September 8 2015 (01ec5277). There is another trial battle flag called SIREN_BATTLE added in September 10 2015 (73a1d07be) that apparently handles the generic wild pokemon that you can't capture.[modify] 命令無視の仕様変更( 命令無視するポケモンのレベルを、スタンプの数から決定する )
※セーブデータからスタンプの数を取得する部分が未実装。
必ず5個もっていることにする。
The Ultra Beast and Lusamine boss flags were added in Jan 7 2016 (a238ec6359), and Ultra Beast AI is supposed to be smarter. Someone noticed this on the Bulbapedia talk page at the time.
Some old gen 6 flags (rival mega ring, deoxys, birch) were removed and poke ride costume flags (rideware_land and sky) were added in Jan 22 2016. (8f04ab631) The sky flag got turned into the swim flag later on the same day.
Aether Paradise is called "POKE_SANCTUARY" for its no ball throwing flag, added in Feb 2 2016 (2c01edf1).
On Apr 1 2016 (5c7ff611) a flag for Nihilego's turn 5 flee was added with a comment about it apparently being strong. I guess gamefreak didn't want to add a mandatory story boss that would be too strong for a player to beat.
Also on the same day (a491faba), a flag for preferring Z-move usage was added, apparently requested for the Hala battle.[modify] 調整要望リスト[168] ビーストが強すぎる 対応
呼び出し側が指定すべきフラグを先行して作成
[modify] 調整要望リスト[106] ハラ戦闘のAIについて
敵AIがZパワーを使用しやすくなるフラグを作成
Stumbling when you walk and press B a lot was added on Feb 22 2016. (8b979e91)
The game has a full set of lunar phases for a month's 31 days, added to skybox code on Sep 10 2015 (b6db53a2e), which also mentioned sun positions.
Out-of-battle move functionality was removed on Aug 18 2015. (80565b510)
The bike/fly/dowsing flags were renamed to pokeride ones on Jun 22 2015. (de50ee16ad)
Last edited:
Or, after deciding it was too similar to Hariyama, added the Makuhita family into the game to replace it being removed from Hala's team.This theory also provides a potential explanation for why it might've been axed: A fat Fighting type Sumo Pokemon with HP as its highest stat may have been too conceptually similar to Hariyama who is already in the Alola dex and on Hala's team
So, did this mean the Photo Club was originally intended to be in SM, a similar feature that was planned for SM (which the one in USUM could probably have been intended to be an upgraded version of), or was it believed to be something different (like actually being able to put clothing on certain Pokemon)?There was another removed SM feature called "Pokedeco"/(ポケデコ), with the first mention being on May 15 2015 (01e4b846) and more work in June. Naoya Uematsu (Pokémon Drawing Programming credits) has a lot of related commits. It had flags involving when to display models and a lot of commits related to model viewers, so my guess is that it would be a Pokemon accessory/customization feature, though there's not really a lot to talk about without the actual assets.
Game Freak's model viewer code (tool_project/ModelViewer/project/PokemonModelDataManager.cs) suggests categories of hat/ribbon/glasses/chest/badge, though the chest category was removed in 45569e05, but ribbons and badges were still counted under the "all chest parts" category so it may have been for simplification.
(...)
In the end, another feature would be internally referred to as deco/decoration, the USUM Alola Photo Club editing features. There's not really a connection outside of names, though it has a similar use in giving you a bunch of glasses and a few ribbon stamps to dress up.
So, did this mean the rewards were at one point still intended to be Badges but later changed to the Stamps? Or did they just keep the value name as "badge" until they got far enough in development to have an official name of the Badge's replacement?Badge count for following orders was removed on December 4 2015 (5f7cf80d98) in favour of stamps and levels. At this point they had already decided on what would be the final obedience levels per number of stamps (20, 35, 50, 65, 80, and max level at "5").
Curious if they had any ideas in mind or if they programmed it in "just in case" they got an idea since, you know, the games are titled "Sun & Moon".The game has a full set of lunar phases for a month's 31 days, added to skybox code on Sep 10 2015 (b6db53a2e), which also mentioned sun positions.
From what he describes in the code it sounds like you were going to be able to put stuff, like ribbons and such, on the actual Pokemon model. It wouldn't surprise me if there was a photo mode attached to it, so they might've dusted off that code and turned it into the photo club in USUM, but the original purpose sounds different.So, did this mean the Photo Club was originally intended to be in SM, a similar feature that was planned for SM (which the one in USUM could probably have been intended to be an upgraded version of), or was it believed to be something different (like actually being able to put clothing on certain Pokemon)?
It wouldn't surprise me if there's similar strings for Let's Go's ability to decorate the parnter Pikachu & Eevee, though.
Sounds to me like it was probably just a fun aesthetic detail to add in, since the game was more "free" 3D there'd be mroe shots of the skybox. Put it in the same bin as Gen 3 having "reflective" pools of waterCurious if they had any ideas in mind or if they programmed it in "just in case" they got an idea since, you know, the games are titled "Sun & Moon".
My first thought was a Grass-type Snorlax as a possibility, and that maybe traces of that form got reused for Gigantamax Snorlax.In the final game Snorlax (or, rather, Munchlax) is only available on Melemele and considering Hala's sumo aesthetic I wonder if Snorlax might've been considered for Hala's team and been a sumo-based Fighting type during the brief period it was on the table.
But yeah, most likely means that there is unused concept art for it stored away at GF headquarters.