Challenge Pokémon X Minimum Battles/"Dexit" Run [COMPLETE]

Fresh off the success of the Ultra Sun version, it's time for our heroine Minidex to move to Kalos and expand the known literature with information on a new region. Since Dexit alone isn't that big of a handicap here (in particular, there's no equivalent to the totems here, in which there is a compelling reason to be strong enough to beat certain battles in exactly one turn) the journals will supposedly be more willing to publish the research if it was obtained by a more hands-off approach, so here are the restrictions.

  • The Dexit Rule: At every point in the game, the Pokedex "Seen" count must be kept as low as possible, until it becomes mandatory to see certain species as a prerequisite for further progress in the storyline. If holding true to this rule requires traveling with a party of only one Pokemon so that double battle trainers don't challenge me at all, or wiping out against trainers that are acceptable to lose to so they never get to send out their backline Pokemon, so be it.
  • All avoidable trainers must be skipped, and wild Pokemon can't be defeated for experience. Wilds can still be caught, which does give experience starting in this game, as long as they are mandatory encounters and/or a species that I've already been forced to see earlier in the game (and, of course, assuming that my Poke Ball supplies hold out to have some left). If I run into a wild encounter by chance that I haven't seen yet, too bad, that violates rule #1 so reset back to the last save point.
  • No buying anything except the various types of Repels (for convenience) and any non-replenishable purchases that can only be made once (for example: TMs, clothes). Even purchases made in other currencies such as Battle Points or Poke Miles are subject to this restriction.
  • No items obtained by means such as Rock Smash rocks, the Pickup ability, or Thief against wild Pokemon may ever be used.
  • Super Training may be used, but the courses on page 4 and 5 can't be played because completing those gives items as rewards.
  • No Pokemon can ever have its affection meter filled beyond 1 heart. (There's no need for a Sylveon exception here because I can already guarantee Eevee itself will never be met throughout the game.)
  • No O-Powers may be used except Encounter, Stealth, and depending on how big the level gap gets along the way, I might eventually give Exp. Points the green light as well.
  • The "Set" option will remain active for all battles, like the opponents and PVP battles always adhere to.
  • No multiplayer or online connectivity at any point, to include trades or importing things from Pokemon Bank.

Badge Checkpoint 1--No Catchy Titles This Time

In the opening sequence in the character's room, while they're still in pajamas and haven't talked to the mirror to get dressed, you get to see your character holding a Pikachu 3DS which they apparently held onto in bed. Did the battery die overnight? No telling. And we never see that system again for the rest of the game, so wave it goodbye while we have the chance.

XY stand alone as the only games in which you have to go all the way to the next town just to get a starter (it helps that route 1 is so short and completely barren) so off we go, I guess. The professor has left three starters to divide among five "upstart" trainers, however that's supposed to work, but for some reason the newcomer to the region gets first choice and, after trying several permutations of the opening sequence, it seems that the best way to start is by picking Chespin. Trevor adds onto this by giving me a Pokedex (boooooooo!) and Tierno somehow thinks it's a good idea to have a love letter from the professor to my mom go through two liaisons. Whatever, guess we have to take one more trip back home to drop that off, but first Shauna is there to challenge me with Froakie. This is a complete non-event of course, two Vine Whips and it's over. It may not have a side effect like the other two starters' moves, but what it does have is an extra 5 power. Cool! Level up to 6.

Now I can go back home and drop off the letter to receive a Town Map in return (funny, it looks like it's already been marked off with the places Mom wants to visit on a honeymoon or something, after getting remarried?) and set out for real. Back in Aquacorde, there's one store that sells nothing but Potions, and another store that sells nothing but Poke Balls (and still throws in the same Premier Ball bonus if you buy enough); neither of those are Repels nor do they go out of stock if I buy there, so I have to leave them alone entirely.

Yes, this means that by rule I have no legal source of Poke Balls when I enter route 2 and encounter the forced Pidgey two squares deep into the grass, so I'm unable to catch it and have to run away. Right after that comes the catch tutorial, which as usual doesn't count as "seen" for the Pokedex so I don't have to take Fletchling or Bunnelby, at least not yet. What I do have to take is the battle with Youngster Austin at the end of Route 2; the Zigzagoon is nothing to divert Chespin from its thus-far-successful plan of "just click Vine Whip" and be able to enter Viridian the ALL NEW Santalune Forest!

Regardless of any self-imposed rules, it's not possible to buy Repels until I both a) reach a Pokemon Center and b) have at least one badge, so the unavoidable grass patches here have no better plan than saving right beforehand, and either rushing through and hoping I make it to the other side, or saving every couple steps as a foothold. At first, 100% of the encounters are unsafe, a figure that drops to 94% after the area's one mandatory battle: Lass Anna and her Pikachu. Far from the US/UM situation where we could keep the Pokedex mercifully Pikachu-free for the entire game, here it's the fifth required species...and still not one I have any interest in tracking down for myself, especially not at these odds where any other encounter forces a reset.

On the other side of the forest we have route 3, where there are a couple trainers who can be avoided as long as we take a few steps into the grass, nothing debilitating. Sneak aside there and I can get to Santalune City, home of the first Pokemon Center, first Gym, and of course a trade for Farfetch'd! Who could say no to that? Well, that last one anyway...as much as you might want to see Farfetch'd, it really doesn't mesh with the goal here (not least because I don't even have the Bunnelby registered to be able to trade for it, since we know the catch tutorial doesn't count). So instead I have to go right to the gym, except there's a blockade there with someone in rollerskating gear. Why here and not, say, the Shalour Gym? Who knows. They won't let me enter the gym until I beat them and get the rollerskates, but all they have is another Zigzagoon so that isn't really a problem.

Inside the gym itself, it's a pole slide down to a giant spider web. Against all appearances, you can actually press Up from the center of the web here and climb back up the pole--that way you're not trapped in the gym if you get poisoned or something. There's one mandatory gym underling here right before the end of the path, using Kakuna and Combee, and what a chance for Chespin to break from its "just click Vine Whip" routine to show off its new move: Rollout. That goes about as well as you might expect. A similar deal for Viola, whose Surskit manages only a pointless Water Sport and weak Quick Attack on the first two turns of Rollout, and her signature Vivillon has Infestation but it's not enough as Rollout 3 goes "CHOO! CHOO!" Or maybe that's a stray Pikachu who snuck in somehow. At least I have the badge.

Oddly, despite the nominal weakness to the featured type, Rollout means Chespin is actually the only starter with a decent chance of getting through the Viola battle with what little experience is available before it when playing mandatory-battles-only (so the starter ends up at level 10 to start the battle). Froakie just doesn't have enough oomph before the chip damage from Infestation adds up, and Fennekin happens to be weak to Surskit's Bubble which isn't good for longevity. More on that a bit later.

Badge Checkpoint 2

While I can buy Repels now, there's no mandatory grass on Route 4 so no need to just yet. What is waiting is Alexa at the start of the route with the Exp. Share, which isn't doing anything right now while I still have a team of one, and at the end of the route is a sight for sore eyes: Dexio, the spokesman for Dexit! He and his buddy Sina, visibly several years younger than when we met them at Heahea City in Alola, seem overly excited about the discovery that Fairy type exists, and--oh yeah, would I come to the lab that's up ahead in Lumiose City. There's more to see around the city than that, like...construction workers claiming the laughably bad excuse of a power outage for why I can't go further (what, you think I can't see that animated billboard in perfect working order on the building right behind you?) Also Restaurant le Nah, but that's both an optional area and a place where the only activity to do there involves seeing Pansage, Pansear, and Panpour, so I'll have to pass.

Oh well, guess I'm going to the lab to meet Professor Sycamore, a man who's apparently driving a hard bargain to try and become my stepfather. As if to further that point, he challenges me, and not the other kids, to a battle. This is fortunately a battle that it's okay to lose, and by wiping against his lead Bulbasaur, I get to avoid seeing Charmander or Squirtle. This is followed up by some words that do absolutely nothing to endear him to me: "It'd be fantastic if you took another Pokemon with you!" Says you, perhaps! Oh well, my choice has already been made. In order to keep the Dexit rule alive, I have to double up on grass starters by picking the Bulbasaur for myself (remember, Fennekin or Froakie would have had a harder time even getting this far in the game with these rules, if I wanted to avoid the type redundancy that way). It's not all bad, though: as usual in Dexit rules, neither of these starters will be allowed to evolve at all, but a nice thing about grass starters is that one of their main weapons is Leech Seed, a move that doesn't care about offensive stats at all. Having two of them means two chances to make something work there, and if (as I expect) later on in the game there's not going to be room for both of them to persist on the team, hopefully I'll have plenty of time to examine their relative merits and decide which one's more worth keeping around in that capacity.

After that unpleasant venture, I get to meet Diantha and Lysandre, decline a battle against Calem because if it's going to let me say no with no further consequence then of course I'll take that, pick up the Quick Claw from one of the random office buildings around here, and stop in a Pokemon Center. Now it's finally worth buying a few Repels, and this center also sells TMs. The only one that really looks appealing right now is Bulldoze, but money is going to be a lot more scarce this time than it was in the last run, and I can't even afford the P10,000 pricetag by now. Oh well, maybe I'll get to come back later. Oh yeah, while I'm here I also want to deposit Chespin in the PC.

The only other path out of Lumiose right now goes to Route 5 and Mr. Bonding, who gives me the first (useless) O-Powers. First Sycamore, now this...Minidex is really starting to get creeped out by her decision to move to Kalos. Being ambushed by a Lucario immediately after setting foot onto the route isn't helping much, but at least Korrina comes to retrieve her unleashed pet and there's no battle or anything else that involves registering it to the Pokedex yet. No, the battle has to wait a few more steps, when Tierno shows up and wants me to face off in a dance contest against his Corphish. Even with Chespin boxed, the new Bulbasaur in the family doesn't have trouble winning that on its own, and shortly afterward we find the reason for leaving Chespin in the PC: a pair of Double Battle trainers who let me pass by unharmed by virtue of having only one Pokemon. The rest of the route is a simple uphill skate with only avoidable trainers, and just a couple patches of grass to run through.

At the top of the hill, we have... Camphrier Town, the start of a saga that's heavy on story but light on battles. The Shabboneau Castle caretakers direct me to Parfum Palace, but don't bother to pick up a voucher for an admission ticket and make me pay my own way instead (hey, at least it's a one-time purchase, nothing forbidden about it!) so I can chase down a Furfrou, watch the fireworks show to follow, and slip out of there with the Poke Flute, Cut HM, and conveniently concealed Amulet Coin that was hiding among the rubble. Around there there's the notorious double Furfrou battle, but this being the run it is, I have a novel approach to making them not a problem: just don't battle them at all! The camera angle makes it less convenient to dodge both the line-of-sight trainers and shaking bushes when coming back down route 6 (and therefore toward the screen), but far from impossible.

Now that I have the Poke Flute, it's time to do the only thing anyone ever thinks of when a Poke Flute comes to mind: waking up Snorlax! (What, wasting a turn in TPP? Who ever gave you an idea like that?) Because this is a mandatory battle, I might as well catch it and have at least something that isn't a grass type: after putting up Leech Seed and siphoning that huge HP stat to offset whatever it throws our way, it takes three Poke Balls to get a catch to stick (a pretty favorable result against Snorlax, in fact, considering I'm stuck with only the gift balls and the ones I can find loose on the ground).

Further down the route, there's the day care (meh), and the Battle Chateau which is of course a huge NO. Chateau and the postgame facility Battle Maison really should have been switched; everything we can ever access in the Chateau spans only a single floor. Even more offputting, the bosses of the Maison are called "Chatelaines" (like a chateau), not "Maids" (like a maison). But enough about that, because there's another battle coming up, and it's a pretty interesting one.

This is a friendly little multi battle, me and Calem against Trevor and Tierno. (Shauna was evidently a healthy scratch; the coach refused to give any comment in the press conference.) My teammate starts with Fletchling, and the opponents have Pikachu and Corphish which are both already tagged. In order to win this battle, I have to eliminate Trevor's Pikachu to get to the Flabébé waiting behind it. But that's not the whole story: as is common in friendly battles, it's okay if our team loses--though in the process of losing, Fletchling will have to be defeated in order to reveal a second-stage starter (so Braixen in this case). This then represents a true fork in the road: over the course of the battle, I'm forced to see either Flabébé or Braixen, but can choose which one. (Obviously, if both Pikachu and Fletchling faint over the course of the battle and it's not the last turn, that's no good and I have to reset, since that causes both to be seen.)

From a long-term planning perspective, there are other battles against Calem where the starter is still second-stage (including at least one at the Tower of Mastery that's a must-win, so no bailing out before Braixen ever comes out), but I can continue to avoid Flabébé forever. so ultimately I want to lose this battle. That means Chespin leads off and starts aiming Rollout at its teammate Fletchling, in a move that somehow doesn't cause permanent dissolution of the friendship. Before the Rollout gets big enough to swallow up Braixen, he decides to aim an Ember at Corphish (probably a resigned gesture of "What does my move matter if it's going to be 3v1?") and somehow lucks into a burn. Corphish doesn't have anything gated behind it so I can afford to let that faint, the only problem is that Pikachu takes ages to wear down Snorlax at 1v1, with both Thunder Shock and Quick Attack hitting for just a few damage each while I waste time by throwing Poke Balls (which don't get consumed, doing so in a trainer battle) and confusing the trio of traveling partners that much more. But it's all for the Pokedex's sake.

After that most curious of battles, I can keep going through to Connecting Cave, and this is definitely a spot for a Repel. Then waiting on the other side...it's Sina and Dexio again, here to "upgrade" my Pokedex with information on the new area. This, at least, feels like a genuine upgrade, enabling something that's never been possible in the course of normal play in any other game in the series. I can open up the Pokedex, click on Coastal, and see those sweetest of words: "SEEN 0, OBTAINED 0". It probably won't last, but it's worth a keepsake photo or two.

The cliffs portion of route 8 has a bunch of grass, and the Pokemon here are all new (they're in the "Coastal" section, after all, where I want to hang onto that zero). Worse, my highest level is still Snorlax's 15, and over a third of the wilds that can show up here match that 15 which means they ignore my Repels. Time for a bunch of saving, then, until I can make it through this mess of a route. This leads all the way down to Ambrette Town, home of...an aquarium, and a fossil lab, and the second straight town with no gym at all.

Looks like we have to go down Route 9 to investigate the fossil situation, but the gatehouse to that route already provides something interesting: Rocky Helmet, an item that wasn't available at all in Alola until the postgame Battle Tree. I expect that item availability will do as much to shape the kinds of battle strategies I can make use of as Pokemon availability will, and at least somebody on the team will be taking the Helmet for quite a while.

The good news about route 9 is that riding on Rhyhorn isn't sufficient cause to trigger Pokedex Seen (just like it doesn't do so for the Rhyhorn in front of my house). The bad news about route 9 is that all the Pokemon that can randomly pop up while riding over the spikes are at least level 15, which means Repel does absolutely nothing for me right now. Time for a bunch of slow progress, saving every few steps on this already-slow method of transportation. They call it Rhyhorn "racing"? Think again.

As if that wasn't enough, there's ugly news about route 9 as well, which is that it leads directly tothe dead end of...Glittering Cave. I can say, with absolute confidence, that whoever designed Glittering Cave did not have Dexit runs in mind. It doesn't take long to see that this is going to be a terrible section of the run and there's not a whole lot I can do about it.

In the first section of the cave, encounters take the form of black clouds, and the room consists entirely of one-square-wide corridors. If there is a cloud on the path, there is no way to go around it to dodge the encounter, the only choices are to go through it and accept the battle, or turn back around. As far as I've gathered from the inevitable testing, there are nine preset locations where these clouds can show up, and it seems that on any entry to this section of the cave, exactly five of them are populated so they really contain the clouds. Traversing the entirety of the path I need to go through here, start to finish, takes me through four of these spots--which, if I've modeled this accurately, means I can get through with no encounters and keep a Coastal Kalos tally of 0/0 but only if the five chosen spots are exactly the spots that are on the side paths, an eventuality that should have odds of 1/126. Saving inside the cave doesn't change which spots are active, so I can't use any footholds here: if I get anything other than the perfect combo of spots, all I can do is reset (if I accidentally run too far and collide with a cloud) or run back to the entrance of the cave, and cycle out and back in to reset the locations.

I figure that all this running to reset the cave, if nothing else, will at least rack up happiness points so I'll be able to get more use from the Return TM, especially on Snorlax. But when I finally get it to pay off, and reach the next doorway with zero cloud encounters, Snorlax's happiness has still only risen enough to make Return about the same power as the Tackle it already has. What a waste.

As if that section wasn't bad enough, my team levels are currently 15-14-13, with two of them being grass starters, and the next challenge is to take down our first introduction to Team Flare grunts who are sitting at 18-20, with a type lineup that--coincidentally, I'm sure (as if the name "Team Flare wasn't a big enough clue)--is rather unfriendly to grass starters! Time to make use of my ace up the sleeve: Super Training!

This feature was in fact available as soon as I picked up my starter, allowing me to sculpt custom EV spreads on everyone without spending money and without having to couple it with experience point gains, but now's the first time it really helps to close a glaring power level gap that comes from playing minimum battles so far (and losing two of them). After the introductory Scatterbug/Spewpa courses (which provide Defense EVs), I have to complete each of the level 1 courses (4 EVs each) with someone, not always the same someone, before I can unlock level 2 courses, but it takes quite a few extra EVs before these barely-trained Pokemon are dealing enough damage with their shots that they can actually, plausibly threaten the level 2 courses and start getting 8 at a whack (plus whatever extras the postgame punching bag might give). Yet another time-consuming task, but at least I'm making slow, definite progress there, unlike the process of repeatedly running in and out of Glittering Cave just for another shot at a winning lottery ticket.

After enough training to really feel those muscles develop, it's time to get on with the actual battles. The first grunt has Houndour and Zubat, but it's not all that bad. For one thing, Houndour at level 16 or above forgets Ember to replace it with Bite, and doesn't regain another fire move until Fire Fang at 28. Additionally, while attacking either of those with grass is a terrible idea, they're both weak to Rollout, and after one Bite gets a flinch in exchange for some Rocky Helmet damage, Houndour for some reason decides to start Howling, and there's no stopping the Rollout train from there.

Second up is a lineup of Gulpin and Electrike. This Gulpin happens to have Liquid Ooze, making Leech Seed a terrible idea against it, but I can fight back with abilities of my own: Snorlax has Immunity, and can Amnesia up in its face while taking no risk of a poison chance from Sludge or Poison Gas; Gulpin for some reason never decides to cancel out those Amnesias by using Acid Spray, because it sees "Sludge is the more powerful move" and never gets the memo about its side effect being a complete blank if that blank is due to an ability, rather than typing. Similarly, Snorlax has Defense Curl to offset Electrike's physical moves, but at a slower pace, and really Bulbasaur should be coming in to resist the Electric moves. I have Nature Power by now, and it becomes Power Gem in caves...nothing really exceptional, but a higher power than the other moves, and not contact so there's no risk of tripping Static.

Finally, we arrive at a double battle, where Calem comes along to face a pair of grunts using Scraggy and Croagunk. My teammate has seemingly completely disavowed Fletchling, and now leads with Espurr, who seemed well-positioned for Croagunk but really just likes to waste a turn setting a useless Light Screen when both opponents have physical Dark moves. The back line consists of the starter and an Absol; because I chose to lose on route 7 and therefore already have Braixen seen, there's no need to play a dubious game of Protect-the-Espurr here. (Players who started with Froakie may see Absol come out second due to the low power of Quilladin's moves as an alternative, but if he has Braixen or Frogadier, that will always be preferred to come out before Absol with their more powerful moves.)

I start out with Leech Seed on Scraggy as that seems like the harder foe to bring down, and Calem's level equality with the opponents really bridges the gap here, with Psybeam obviously being a OHKO on Croagunk. Even so, Snorlax ends up coming out and having to take a Brick Break from Scraggy while I wait for the Leech Seed to tick down, and despite the 5-level disadvantage and a big fat 0 in the Defense IV roll (emphasis on the big and fat), all that Super Training is enough to survive the hit and retaliate with...uh, Tackle. But with Braixen helping out, it's still a win, and the start of that time-honored tradition: pressing B to cancel evolution.

Now that Team Flare has been defeated and...hasn't left, they're all still standing right where they were, whatever. I can still talk to the scientist who decides to let me choose a fossil! Only this time it's not a Helix/Dome choice, I have to pick either Jaw or Sail. I'll take Jaw here just because of the prospect of a relatively early dragon, even though I can't use it for anything yet.

There's even an Escape Rope right by here so I can leave the cave without having to play for that 1/126 chance that the path is clear again on the way back out! Although...I do want to go back to the narrow corridors section, and reset a bit. If I can get three specific spots clear, which has slightly better odds of 1/21, then I have a clear path to backtrack to the Shadow Claw TM before popping the Escape Rope just so I'm never tempted to come back here again. Sure, Snorlax can't actually learn this move (despite already having a weaker Ghost move in Lick), but maybe someone along the way can.

Unlike the original games where Escape Rope went directly to the last used Pokemon Center, here it only drops me off at the entrance to the cave. This means I still have to go back through Route 9, but at least by being level 16, Repels do block out 30% of the encounters, so there's an actual purpose to using one and the trip back to Ambrette hopefully won't take as long.

I have to go down through the aquarium to get a pointless Old Rod and proceed through the beach section of Route 8, which is at least much friendlier than the cliffs. From there I can get to Cyllage with no grass patches at all and only a couple easily dodgeable trainers; I can even keep going to route 10 where there are about three mandatory grass tiles and still no mandatory trainers...yet. But that's a dead end for now, it's back to Cyllage to pick up a bike and...look around.

One of the places I can get from here, at the top end of the bike track, is a back door into Connecting Cave. And because I've now seen Zubat because of the Flare battles, and unlike in Alola there are HMs that exist here and will actively need to be accounted for at some point...hey, why not Zubat with the aim of reserving it for Fly use later on? Obviously it's no good in the upcoming gym, but by getting it now, it'll at least be able to siphon a half-dose with Exp. Share and maybe not fall far behind. Plus, for once I'll have a team member that isn't 7:1 male-biased in its average gender ratio.

But it turns out...all of Grant's underlings are optional. Which means I have to skip them all, by rule. Which means...I'm stuck with a trio of level 16s and a freshly caught Zubat at 15, against a pair of level 25 fossils. If I really want to, I could go back to route 10 and get a Houndour (Y players would get Electrike instead), which can start at a level as high as 21, but from there the only way I would be able to grind is with more catches, with finite ball supplies, where anything in Coastal Kalos other than Houndour/Electrike is a reset. I'd rather not.

The one good thing to offset this level chasm is that we have EVs and they don't. Still, Amaura has an obvious OHKO against everybody except Snorlax with Refrigerate-boosted Take Down, so I'm rather constrained with who I can lead out. Without a KO available, Amaura flails about seemingly at random, fishing with Aurora Beam and even using Thunder Wave when it's obviously much faster than Snorlax already (so all it accomplishes is the FP chance). Meanwhile, Rock Smash isn't typically a very strong move, but between the double weakness, defense drop on the first hit, and EVs, it manages to get a 2HKO through the 9-level disadvantage and bring out...Tyrunt.

Tyrunt takes less damage from Rock Smash as it lays down a Stomp, then next turn tries to finish Snorlax off with Bite...but wait, here comes Quick Claw to let Snorlax put in a second Rock Smash before it falls, adding up to about 50% damage--good work. Now I just have to send Chespin out, use Growl twice to survive two hits while Tyrunt attacks into the Rocky Helmet both times, and because of all that prior damage, two rounds of RH chip leave Grant in healing mode. This means a free opportunity to use Leech Seed. With two Growls and Leech Seed now going, I can afford to switch straight to Bulbasaur without needing to sack off Zubat, survive another hit, and add even more chip damage with Poison Powder. Just one more turn and I can switch back to Chespin who survives Stomp with 2 HP left, sticking it to him with one last Rocky Helmet trigger, and ending the battle. Guess it wasn't that bad after all.

It was possible to get through route 10 with no mandatory trainers before. That's no longer the case now, as after beating Grant, the Flare grunts show up again at strategically placed choke points along the route. The solution, then, is not to go into that route anymore: if you already went through it earlier and visited the Pokemon Center up in Geosenge as your most recent one, a wipeout drops you off there after teleporting past the entire route. Even if I stop by the Cyllage center just to deposit some of my team members in the PC and never go to the counter to heal, that's no good: Cyllage still counts as my most recent center in that case and the whole operation is blown. However, there is still a PC I can easily get to: the one at the fossil lab! While I'm here, I might as well cash in the Jaw Fossil for a Tyrunt, just in case it comes in handy later (if nothing else, it's three levels higher than the rest of the team to be a bit of Repel insurance), then I can deposit everyone except the 2-HP Chespin so the process of wiping out won't take as long (and so that the money lost will be keyed to level 17 again, instead of 20 like it would be if I kept Tyrunt in the party).

Now I just have to track down a Zubat again (30% in Connecting Cave...this'll probably be one of the main annoyances throughout the run, wilds in XY are so diverse that almost all areas will probably have a majority of wilds off limits at any given time if I'm actually trying to look for something). Take one hit, black out, and magically come back to consciousness in Geosenge! Pokedex-wise, all this really accomplishes is skipping Golbat temporarily, but it's something. And now we can probably use another rest right away.
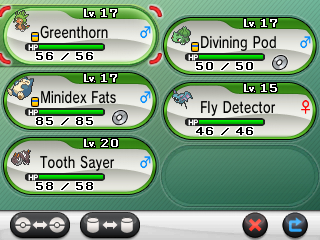
After 2 Gyms
Central Kalos Seen: 19 (Owned: 4)
Coastal Kalos Seen: 4 (Owned: 1)
Current Team -
2020-10-03_15-07-32.307_bot.png

Chespin L17 (Leech Seed/Growl/Vine Whip/Rollout)
Bulbasaur L17 (Poison Powder/Rock Smash/Leech Seed/Vine Whip)
Snorlax L17 (Rock Smash/Defense Curl/Amnesia/Lick)
Zubat L15 (Protect/Astonish/Bite/Wing Attack)
Tyrunt L20 (Rock Tomb/Stealth Rock/Bite/Charm)
 
Badge Checkpoint 3

The previous section ended with a battle against a pair of level 25s (the unevolved fossils), so for the stability of the level curve, it makes sense to have this one start with another pair of 25s. Of course, this time it's Korrina and they're both Lucarios, with the exact same moveset. This is where it's big to miss out on the Bulldoze TM from back where it's available; instead I have to improvise something.

Despite leading with Bulbasaur, Lucario is still determined to start out with Power-Up Punch to grab the attack boost, while I go for Leech Seed. From then on it's a back-and-forth affair in a manner of speaking, as I try to soak up PUPs with the double-resistant Zubat and, tempting it into a Feint the following turn, switch to Tyrunt and blunt the assault. Tyrunt can then stall for a turn with Protect to waste time; Zubat also knows Protect but using that move into the expected Feint is obviously pointless. With Leech Seed healing back some damage each time, the operation is similar to a trap pivot, but each successful PUP landed (or if Lucario decides to go for Swords Dance instead) pumps up its damage output and wears into our health a bit more. Leech Seed does hold out long enough for us in this case, though.

With Zubat fittingly being out to sap the final bit of health from Lucario 1, I switch back to Bulbasaur to take a Feint from the second...and with how much damage that dealt, I end up sacking it to a second Feint. But this is what double grass starters are for, as Chespin rises up with its own Leech Seed and we start the very same cycle again. Lucario even used Metal Sound at one point, despite that move serving absolutely no use for it. Several turns later, the second overleveled Lucario meets the same fate as its partner.

The good news is that now I can go to route 11 and not only are there no mandatory trainers here, I can avoid most of the grass as well. Reflection Cave is another story. The whole cave counts as encounter-eligible spaces just like it was grass, and Repels can't dodge them until somebody hits level 24, so it's time for a lot of intermittent saving with each bit of ground gained. Forget the threat of Wobbuffet that this place is notorious for, I can't afford to encounter anything here.

Trainer-wise, the gimmick here is "the walls are mirrors so even though the trainers appear to be facing away from you, they can see you anyway". Functionally it's no different then having them face the sensible direction to begin with, but I guess it gives the animators something to do. Whatever, first up we have Backpacker Lane and a solo Linoone. Its only damaging move is Headbutt, which Tyrunt can tank fairly well and throw in Rocky Helmet for some damage on top of what it gets with its own moves. That wasn't so bad, and shortly after that Tierno shows up with TM70. There aren't any dark caves in this game to light up with Flash, but Flash can still be used in a cave to pan the camera out a bit and have the effect of a Cleanse Tag for as long as I'm still in the cave.

Next up is the first "Ace Trainer" of the run, bringing a team of three with Doduo, Granbull, and Helioptile. Two of these are easy enough to wrangle with Snorlax; for Granbull I send Tyrunt back out and engage in a Charm war before it finally starts launching pitiful attacks into the helmet. There's one more mandatory trainer here, using Chimecho and Golett--hey, shared weaknesses!

If I had been scouting out the terrain up ahead, I would have had that battle go differently by throwing sacks on the altar, as there are two more trainers I have to cross paths with, but they fight as a double battle and the only way to dodge them is by having only one healthy Pokemon. Beats having to register Vespiquen, so...rather than trying to backtrack through the whole cave, it's Escape Rope time. And if I had really been scouting what was to come, I probably should have taken advantage of the newly unlocked Golett by heading back into the tail end of route 10 and catching one for myself. But no dice, and I have to return to the center, deposit everyone but Tyrunt, then traverse the whole thing from beginning to end all over, just to avoid that one battle.

The cave emerges in Shalour City, where Trevor and Tierno stop me for a very important reason. Trevor wants to compare Pokedexes against me, which is rather like the Harlem Globetrotters going "Who should we put on our schedule this time? Hmmmm...how about the Washington Generals again?" Needless to say, I don't win the comparison, and it turns out the number it takes to win the comparison (40 from among the coastal dex alone) is exactly the same as the threshold I would need to retrieve the Eviolite from someone in a nearby house. So while I have the Rocky Helmet pretty early, this place is the only way I can get Eviolite and it'll be a while at least before this is remotely possible. The items shape the flavor, I tell you.

The next stop is the tower way in back, where everyone meets up and I have to battle with Calem, who's...level 28 to 30. When I have nothing higher than Tyrunt at 23. Meh. Since this battle is supposedly to see who's worthy of inheriting the lone mega ring, losing to the lead isn't an option either. The good thing here is that his lead is Meowstic and not all that threatening. Chespin can survive a Fake Out+Psybeam combo, which is long enough to set Leech Seed, and then it's Snorlax's turn to do what it does best: sit there lazily. After 3 Amnesias, Meowstic's single-digit damage is completely blanked by the recovery from Leech Seed, the turns it spends on Light Screen do nothing, and I can spend the rest of the LS waiting period using Defense Curl as much as possible, getting to +4 defense. These defense boosts really ended up being completely pointless, as Absol took advantage of its 50% critical rate on Slash to go for that twice in a row, pulling it off 2 out of 2 and driving Snorlax down to about 10 HP, but at least it still put up 2 Returns in the mean time for about half. Not wanting to throw away Snorlax just yet, in comes Tyrunt who only takes a Quick Attack, and the Rocky Helmet certainly dealt back more than it originally dished out. Hmm, can Zubat take a Bite from this thing? No, not even close, and even with its speed EVs the level gap here is still too big to outspeed it. That won't work then. What might...oh, how about sack Chespin on the Bite, Bulbasaur can tank another Bite (which only has 1/8 critical rate instead of Slash's 1/2), no flinch, 17/63 gets into Overgrow range for Razor Leaf...but not quite enough. Is this Quick Attack range right now? Looks like it, and sure enough Absol goes for QA again and only manages the weak hit as Tyrunt comes back and finishes it off by lowering the helmet.

Finally we have the level 30 Braixen. Two Quick Attacks have left Tyrunt healthy enough that it can survive a Psybeam to retaliate with Rock Tomb into yellow, then I can sack Tyrunt by spending a turn healing up Snorlax. The speed drop means Zubat is faster than Braixen, and I hope to get one Wing Attack in for the chip damage, but for some reason I get to use Wing Attack twice after a curious move selection of Fire Spin the first time. There's still some HP left that Snorlax has to finish off, left with enough of its own HP after the Super Potion that I don't need to rely on a QC.

With that, I'm all set to receive the power of mega--yeah, right, that would be too easy. I have to go back to Korrina's gym first, then my roundabout trip can come back here for the real honors. And this gym has no real trickery involved, only "You have to beat all four underlings to raise up the grind rail for access to the center platform, no way around it." Bleh.

This is where having the Golett would have come in extremely handy, as I could catch a fresh one at level 21 and solo the whole gym with it thanks to that perfect typing. But getting one now means backtracking all the way back and forth through Reflection Cave (no access to Fly yet), which requires depositing everyone in the PC so I can avoid that double battle. Even though Repels can work now, I'd rather not.

It's not all bad, because Zubat tends to do great in matchups like these. Wing Attack isn't very impressive damage, but if it's only taking Fighting moves it's easily enough to win a race, and against more threatening Normal moves, Tyrunt can always come in to stick its helmet out. But between the four trainers, there are eight Pokemon, all new to the dex: solo Heracross, a Meditite/Mienfoo pair, Sawk/Hariyama, and even a team of three with Pancham/Throh/Machoke. The good thing about this many battles in a row is that it sure helps the team get caught up, with three of them in the range to get boosted XP now. A range of 24-27 against Korrina isn't as bad as last time, to be sure.

Korrina's lead is Mienfoo, which...just got checked off by one of the underlings, fair. It has Inner Focus, so presumably Korrina is aware of the existence of that ability. Still, she orders a Fake Out when Zubat predictably has the very same ability, and smacks it with a Wing Attack in return. The following turn, those speed EVs come in handy to let Zubat go first in spite of the level gap, and the second Wing Attack KOs.

Next I've got Machoke, the one Pokemon in the gym that would be physically capable of damaging Golett if I had one (but Rock Tomb is still far from impressive there). Wing Attack would only be good for a bit over 25%, and surviving a Rock Tomb is obviously not happening, so who should take it? Machoke has Guts, so Poison Powder with Bulbasaur is a terrible idea...Tyrunt could conceivably start a Charm war, trying to reduce Machoke's attack faster than it can boost with PUP, but then their boosts come with some damage tied to it and my debuffs don't. Instead, the counterintuitive play here is to switch to someone who's never going to care about the speed drop: Snorlax!

Shrug the Rock Tomb off, and despite being 5 levels down, Snorlax is nowhere close to being in KO range froma STAB, super effective PUP. In fact, Machoke follows up with a Leer first, then PUP, and Snorlax still survives which means two shots of Return with its power up into the 70s by now (the first one had a pointless Quick Claw). One more hit will KO, and I might as well stay in just in case I get QC again for that...but no. At least Zubat gets to come back out and finish the deal.

Last up is the one new entry on Korrina's team: Hawlucha. Despite having nothing but Fighting moves (Flying Press makes no difference here), this hits hard enough, combined with the prior Fake Out damage, that I only get one Wing Attack in before a pair of Flying Presses get the KO. At least it never used PUP or Home Claws and is still at +0, so Tyrunt might be able to do something.

...or Tyrunt could also get 2HKO'd by (neutral) Flying Press while only getting to use one move in the interim. The good news is that move was Charm, and Hawlucha was doing a great job impaling itself on Rocky Helmet with those two hits. Even without using a damaging move, it still managed to bring Hawlucha down into the yellow, but now I only have the pair of grass starters left.

The really delicate issue here is that Korrina hasn't used her heal yet, and if she does then I don't really have any firepower left that can break through before getting wiped away. It's only a matter of time before Hawlucha does something about that -2. This is even more of a tangled web than Viola's gym. Hmmmm...how about Bulbasaur, who like Tyrunt manages at least a neutral matchup against the big hit, and outright resists the small one.

At last, Hawlucha goes for the attack boost to get back to -1, and I pick Leech Seed, draining a bit of health but still above that key 1/4 threshold for now. -1 Flying Press still doesn't KO Bulbasaur, meaning I get a chance to go for...Nature Power, turning into Tri Attack. Not quite enough damage there, no burn, but...close enough that end-turn Leech Seed damage does the rest before Korrina has another window to heal! Success!

Badge Checkpoint 4

Now I have three badges, and it's back to the Tower of Mastery on Korrina's roundabout path to succession (indeed, a roundabout path up the tower ramp itself)...which means a very overengineered, cinematic battle (to the point that it might get you questioning whether the specific extent of the mega stat changes themselves are part of the act designed with this singular moment in mind). Lucario vs. Lucario.

So, fun fact: In the first Korrina battle in Geosenge, where both Lucarios are fighting on her side, the IV readings have them both with all 18s. That's not the case here, as the one she uses has all 22s (and a Relaxed nature), but yours gets the very specific (and very wonky) spread of 6/25/16/25/19/31 Hasty. When you receive the gift Lucario after this, it has that very same build. Considering that any Riolu you catch in the game has a guaranteed 3 maxes somewhere, if you had managed to evolve one of those by now, you probably would have been better off using that one. Alas, here in the Dexit department we have no reason to even look at Riolu, and that's not an option.

The opposite natures and max speed mean that you always get to go first, even if you don't go mega. However, if you don't, the stats are carefully calibrated so that Mega Lucario's Power-Up Punch has a minimum roll of 88 damage against you for the exact KO, if your action is anything other than using an X Defense. Even then, you'll be in the same situation next turn with +1 vs. +1 and a hefty chunk of damage taken. Even if you do use an O-Power to be ready for the first turn, this battle has specific instructions to ignore O-Powers, so your power will simply held off until the next battle you participate in that isn't this one.

There is still a slim chance to beat Korrina's Lucario without going mega yourself, but you would need Bone Rush to get all five hits, and two of those to be critical (in theory you could do it with just one critical, but then you would need very high rolls on all of them). Even so, that isn't good enough. You're forced to keep repeating this battle, with no opportunity to do anything outside of it, until you battle to Korrina's satisfaction. And her satisfaction is achieved...not by beating her, but by clicking the Mega Evolution button once. You can completely throw the battle if you want by using Metal Sound twice, as long as you do so in mega form so that you survive long enough to use it twice.

Since this battle gives no experience points and no money, winning is even completely irrelevant. Sure, going Mega-PUP twice will ensure you win barring a critical (as the defense boost Lucario gets for mega evolving does enough to make the incoming PUP a guaranteed 2HKO on a max roll as opposed to a guaranteed OHKO on a minimum), but even if you get bad luck on that first turn, you wouldn't get another chance to try again unless you reset the game.

Anyway, after all this railroading, or grind-rail-roading, or what have you, Korrina says that wouldn't it be a good idea if I took that Lucario with me? But unlike the battle that just took place, I do have a choice. While Lucario would easily shoot to the strongest team member, I want to see something...and say "No" to keeping it. Turns out, even after saying No, the Pokedex still counts Lucario as "Owned" on the basis of the one battle where I was in control of it. Not that I really care about the owned count here, but that's rather disappointing. I can always come back for it later if I need the extra power of a Lucario that's in Kalos and still somehow has only one max IV.

Now I can finally head out of town...whoa, hold on, not so fast! Calem's back with one last message, and the all-important HM 3. The only thing on the team that can learn Surf is Snorlax, so...guess Snorlax is going surfing. There's about a four-tile gap of water on route 12 that demands using that to cross right away (a gift Lapras too, just before it, but I don't need to be taking that either). And what could be on the other side but...the Skiddo ranch? In addition to just riding for the fun of it, we can take advantage of the ability to jump broken sections of fence, or jump up ledges the wrong way, and one other very pertinent piece of mobility: from atop a Skiddo, no trainers will challenge you even if you ride right in front of them! That's useful for getting to the end of the delimited area where I can ride it with no battles, and then it's just up the stairs to Coumarine City.

While I don't expect to need Surf on Snorlax again, the move deleter is still a bit away. I could actually delete the move sooner than that, by going to the day care and putting the HM in slot 1 when it's right on the verge of leveling up to a level that gives it a new move. It will clobber the first slot HM or not to learn the next move automatically, and shift everything else up a slot. The problem is that I'm still stranded away from being able to reach the day care.

Around here there's someone who gives away four TMs, but only one per day, by holding a quiz where she describes the effect of one of them. You can reset to manipulate the outcome of this quiz, and the one I really want right now is Acrobatics, so that's what I get. In this game, Zubat gets it by level-up, but not for a few more levels, and it's really handy coming up. 1, 2, and...Poof!

As if this area isn't already loaded with TMs and even HMs, Sycamore (along with Diantha...what, his other secret fling?) is waiting in the monorail terminal to give me Fly, so soon after picking up Surf. The problem is I can't actually use this out of battle yet, not without beating the nearby gym. And of course I have to go up the monorail to get there.

Before I can head in, Calem's waiting outside the gym, demanding another battle. He's got the same team as before (no new dex entries, hooray!), plus a few levels, but we've gained levels too. It starts out the same way, Chespin going for Leech Seed and switching to Snorlax who can tank moves as long as it takes for the Leech Seed timer to count down. This time I don't have Defense Curl though (it got overwritten by Surf), so after Amnesia is maxed out, we just have to witness the laughable damage output from Snorlax's Surf to waste time.

This might have been just as well, though. Last time when Snorlax had the defense boosts, that probably nudged Absol in the direction of using Slash to try and break through those boosts. Now there are no such boosts, so it goes for Bite which has the lower critical rate, and deals less damage for the 3/8 of times that Slash would get a critical but Bite wouldn't. In exchange for that, though, it gives back a lot on the 30% flinch chance. So instead of having Tyrunt be the traditional helmet-taker, Snorlax gets to hold that role now, ensuring that even if it does take a flinch, it still gets down some damage for the trouble. As it turns out, no flinch, and Snorlax gets two Body Slams down plus three rounds of helmet damage as I sack it off on the final Bite for a double KO.

Tyrunt gets to come in fresh for Braixen, who still hasn't gained its Psychic type to pick up a weakness to Bite. It is still weak to Rock Tomb though, which is just as good as a theoretical SE Bite would have been, and that does enough to finish the deal in two hits. All that got me was the money and access to the gym's entrance, and now the Rocky Helmet can go back on Tyrunt as usual, while Snorlax takes a more vital item: Lucky Egg, to patch up the fact that its leveling rate is slower than everyone else on the team.

The gym itself is full of Pokemon Rangers, three of the four which are mandatory, and for all it's a literal "jungle gym" with its ropes course, it's also Zubat's playground, empowered by its new move. Chaise is up first, bringing Simisage...and it uses Torment, guess I'll have to switch after all. And probably get back Protect after this, just in case I need it to kill more turns in similar circumstances. Brooke has Roselia and Wormadam, where the Wormadam quite rightly shudders in anticipation of what's coming, and can't do a damn thing about it. Last up, we have the combo of Gloom and Exeggutor...okay, I don't think Zubat's going to be able to beat Exeggutor, fair. One switch to Snorlax, another to Chespin, and use Poison Jab to take care of it instead.

Ramos has a comparatively wide level range of 30-34 between the low and high ends of his team, and for once we're pretty much caught up...to the low side of that, at least! His Jumpluff leads off against Zubat, and it's a battle of STAB Acrobatics. Jumpluff goes first and hits straight into the red, with Zubat barely reaching yellow in return. Not winning that 1-on-1, then. I'll have to go to Tyrunt, who's in much better shape from the Acrobatics it takes (probably about equal to the Rocky Helmet damage). That's followed by a Leech Seed which never gets to matter because Rock Tomb finishes the job. Snorlax levels to 28 here off the residual experience and has a chance to learn Rest, which displaces Amnesia. Got a hunch it might be coming in useful soon, just figuring.

As can easily be predicted by looking at his lineup for any length of time, it's straight to Gogoat next. I don't want to stay in to take Leech Seed, so I have to switch to someone. What move does Ramos want to use here...hm, Bulldoze isn't in KO range, so Grass Knot is likely the play, and Chespin can tank that easily (Bulbasaur would do so even better, but has absolutely nothing productive to do in return). Time to go fishing with Poison Jab and get it, as Take Down deals about half, and another Take Down goes into Tyrunt for the extra "oof". Now it does look to be in Bulldoze range, so I can bring Zubat in completely free (important with its health as low as it is), Protect to waste a turn and get more poison damage, and...hm. Ramos might be in healing range now, but it's tough to risk it. I won't go for the Acrobatics, just send Tyrunt back out...yep, here's the Hyper Potion. So back to Zubat on another Bulldoze, Protect...this time Snorlax takes the Take Down. Gogoat could deal a lot of recoil to itself if it tried to Take Down its way through Snorlax's HP, but Ramos of all people knows how fat Snorlax is, and that he can get better damage (and no recoil) out of Grass Knot. Still, Snorlax with 6 level disadvantage can incredibly survive the Take Down and two Grass Knots, using Body Slam on the first and just hanging on to Rest back to full health against the second, and now it's healing time again. I can let Snorlax lie around to burn sleep turns, taking two more Grass Knots before waking up for a second Body Slam. It won't survive a third, so this time Bulbasaur comes in to blunt the assault, and Ramos doesn't have any heals left. Protect and a useless Poison Powder lets the timer tick for 3 more turns, switch in Snorlax for more Take Down recoil, and back to Chespin before poison damage ticks one last time to put an end to the rampage that's decidedly less happy-go-lucky than romping around with Skiddo on route 12. Skiddo also had the good sense not to register itself in my Pokedex, either. For shame.

Last up is a unique occurrence for the run: I get to battle a Pokemon that I won't be able to find in the dex afterwards. Ramos sends out Weepinbell last, and Weepinbell is assigned to the Mountain portion of the Pokedex which I don't have unlocked yet. The flag is still set though, and I'll be unable to repeat the 0/0 clean slate after the new addendum arrives. No getting around that. As for its actual battling prowess, it's got Acid and outspeeds Chespin, finishing that off before we can move. Oh well, that means a free chance to bring in 11-HP Zubat, figuring I can soften it up with a hit and use some combination of Snorlax or Tyrunt for the finishing blow, possibly after a single healing item. But Acrobatics gets a critical for the straight OHKO, saving the hassle.

This victory unlocks a few things: the money and the badge, of course. Grass Knot TM, maybe that'll come in handy some time. And the ability to use Fly out of battle, which is definitely handy for revisiting places I've left behind, now that "9-and-a-third" of them have already been unlocked. Like...let's start with the "one-third" part of that, Lumiose City, and finally go back to buy Bulldoze and the other missing TMs that I didn't have enough money for on the first trip! But of course the rest of the city is still under that enigmatic power failure, which...eh, how important can that be? We can leave it for later.

After 4 Gyms
Central Kalos Seen: 31 (Owned: 5)
Coastal Kalos Seen: 17 (Owned: 1)
(Mountain Kalos Seen: 1, Owned: 0, but this dex hasn't been obtained just yet)
Current Team -
2020-10-06_00-14-26.575_bot.png

Chespin L31 (Leech Seed/Growl/Vine Whip/Poison Jab)
Bulbasaur L30 (Poison Powder/Growth/Leech Seed/Grass Knot)
Snorlax L28 (Rock Smash/Surf/Rest/Body Slam)
Zubat L29 (Protect/Acrobatics/Bite/Fly)
Tyrunt L30 (Rock Tomb/Stealth Rock/Bite/Charm)
 
Last edited:
Badge Checkpoint 5

After finishing up the shopping spree and heading back to Coumarine, the next stop is a trip south to meet Sina and Dexio again, finally getting that Mountain Kalos Pokedex upgrade (boo! hiss!) Of course it starts out with a reading of 1-0, thanks to the Weepinbell Ramos used, and they want it to start seeing use in earnest with the wildlife on route 13. Minidex being Minidex, though, we've got other ideas.

"The wildlife on route 13" is notoriously unfriendly, featuring possible trappers in Dugtrio and Trapinch, but I can't encounter any of them regardless of ability--my Shed Shell equivalent is the reset button combo. And encounters here work differently than on other routes--the notorious moving dust clouds.

If one of the dust clouds gets even two squares away, that's close enough to trigger a battle, which means a significant chunk of the screen is precarious real estate that I have to keep them away from. I can't use Flash to zoom the screen out and see further ahead, either--that only works in caves. The real trick to this is...they only move when the player does. It's not a time-based challenge, but a step-based one where I can afford to be deliberate and take one step at a time when I see them approaching. Granted, sometimes the wind is a factor and if I need to move left, the clouds can move faster than I can. That's a problem because the destination is over to the left, but they also don't like pursuing me while I'm hugging the wall, and eventually lose interest or even disappear back into the ground.

So that's going to be the main key to get to...that Team Flare grunt again. It's probably the same guy as the first one I fought back in Reflection Cave (Houndour and Zubat), but this time they've both evolved so I'm facing Houndoom and Golbat. Both of those species happen to be weak to Rock Tomb so it's dubious what he's trying to accomplish, and because one of them is Golbat, that of course means Zubat has the green light to evolve! Of course this means it stops getting boosted XP, but I'll take the improved stats for what's coming up.

The Power Plant comes off about as one-dimensional as dungeons get in the series. There are ten Team Flare goons clogging the place up, and every one of them is a mandatory battle, cutting off an entire cross-section of the forced path with their line of sight. Pokedex-wise, the only damage comes from Mightyena in battle 3, Swalot in battle 6, and Liepard in the seventh. With Golbat ready to put its improved stats to use, we manage to get through the whole generator gauntlet without having to leave and go take a heal. It helps that the opponents are prone to do stuff like Beat Up from a Houndoom with no other teammates--nice 14 BP! The area boss, Aliana, has a solo Mightyena--its only attack is the 10-PP Assurance which has no chance of powering up in singles against a slower opponent (at least not if I don't do anything silly like go for Protect while confused).

Now that Team Flare has been driven out, we get the power back! Yay! Except...I can fly directly to Lumiose after that to avoid crossing through route 13 again, and the construction workers are still there to block all the paths north, citing...a power outage! So it looks like another trip through 13 after all, and at the end of that we get the first meetup with AZ, who's just...doing things. Despite how much power has been attributed to AZ, having him come back within the city limits isn't the trigger to end the power outage either. I have to keep going through the gate myself, get a cutscene with Shauna, and specifically head toward Prism Tower from the north, and only then is the outage lifted to allow free exploration of the whole city.

Much of the city involves stuff like the Poke Ball Boutique that I'm not allowed to buy from, though, or the back alleys with unnecessary battles, so it's up the tower we go. It's the quiz gym, and every incorrect answer costs an extra battle. This being minimum battles, I obviously can't afford any of those. The mandatory battles that go with the correct answers pit me up against Dedenne, Raichu, Ampharos, and Plusle. Snorlax has no problem taking those down with Bulldoze, of course, though Raichu's Thunderbolt does hit for about a third. Fortunately it's not so focused as to keep up the pressure, straying into Quick Attack while I'm spending sleep turns from Rest, and it can't make too much damage stick.

And with only Clemont to go, my team sits at 34-37 against his 35-37; basically completely caught up despite the minimum battles. Sure, I've been getting boosted XP on some team members for being past evolution level, but it would be interesting to hear what level they expected us to be at by this point. I don't even have anyone in the "fast" XP group like Azurill!

Clemont leads with Emolga, and well...can't Bulldoze that. Or can I? Tyrunt also gets Bulldoze, and by resisting everything and having its physical defense significantly higher, that'll probably tempt Emolga to go for Volt Switch before my turn. Or...sure, it could pick Quick Attack too, dealing 6 damage and taking Rocky Helmet but at least my Bulldoze whiffs. I'm winning this race anyway, so let's keep going...second time around, it gets enough sense to Volt Switch out of there and bring in Magneton with the idea of using Mirror Shot for lots of damage. But instead, it gets to take lots of damage from the second Bulldoze. Ouch.

Now I can switch to Bulbasaur on what Clemont sees as an urgent healing turn, and with no KO available for Magneton now, it uses its field effect in Electric Terrain, whatever good that does. In return for that, it takes a Leech Seed, and the timer is on. Bulbasaur has all of no damaging attacks right now--Leech Seed, Protect, Synthesis, and a currently-useless Growth--but it's great for recovering all the abuse Magneton can dish out (even terrain-powered Thunderbolt deals less than half because of the resist). Seven turns of that and Clemont is ready to heal again (using the second and final Hyper Potion), but I still have more Protect/Synthesis PP left, so I might as well keep going with that plan. As the health ticks lower once more, and Electric Terrain conveniently runs out one turn, I expect him to reset terrain next turn, and take the opportunity for a switch to *gasp* Golbat! But instead it uses Magnet Bomb, which is fine. The Leech Seed timer heals off some of that and gets to within two turns of a KO, just what Golbat needed. Kill one turn with Protect, kill another by going up into the air with Fly, and it's a good thing Magneton has Thunderbolt instead of Thunder because that can't hit mid-Fly. The final bit of health drain happens with Golbat still in midair.

There are some not-so-good things as well, though. Because of the EV imbalance, Golbat is actually so fast that it outspeeds the EV-less Heliolisk and comes down from Fly to deal barely anything, and another Thunderbolt obviously wipes it out. Guess Snorlax will have to clean up from here, using...Bulldoze, and Bulldoze again. It's got 31 HP left after taking two Thunderbolts, might as well give it a shot against Emolga as well. Can it take an Aerial Ace from here...guess so, landing on 1 HP! Body Slam...not quite, and of course there's exactly 0% chance to land paralysis against Emolga in this game. Let's finish up with a trip back to Tyrunt, and a Quick Attack into the Rocky Helmet because they just never learn. Thunderbolt is the TM prize this time, and...Snorlax can learn that, sure, but it already has a special move clogging up one slot with Surf, no need for another.

Badge Checkpoint 6

After another pointless visit with Lysandre (a King's Rock, hooray, when the only thing remotely fast on my team has Acrobatics as its weapon of choice), we can finally go through the route 14 gate! Calem is waiting there, and despite what Alola might have conditioned you to believe, I can't progress by losing this battle. It goes about the same way we're accustomed to: Snorlax goes as long as it can, then Tyrunt picks up the slack. It has Strong Jaw-boosted Crunch now, allowing it to quickly dispatch of the one new species we find here: Delphox.

The rest of route 14 is a swampy mess, but it's mercifully empty, apart from being able to get the Toxic TM, probably for an upgrade to Bulbasaur's now-deleted Poison Powder. Oh, and a meaningless visit to a scary house where we have to sit through a pointless story for some reason. Plus, the one good thing about being on par with a gym leader: Repels actually work for a change!

As a matter of fact, that Calem battle is the only mandatory battle between Clemont and Valerie. We can warp around the dollhouse and avoid all trainer battles there; at least they're not shoving forced trainer gauntlets everywhere. But now the gap between Clemont's max of 37 and Valerie's at 42 is a gap we couldn't make up from that one battle. At least it's a relatively inconsequential gap by this point, something I know we can overcome.

The lead of Mawile turns out not to have any Fairy moves, so this is the one thing I can comfortably send Tyrunt out against. It doesn't even have Intimidate...though Hyper Cutter does mean I can't Charm it. Mawile does have an effective Charm of its own in Iron Defense to slow the Bulldoze train down (but not literally, as it takes two Bulldozes before Tyrunt is faster), but other than that any move it uses is going to trip Rocky Helmet. Valerie goes through one heal before I get enough damage on a round of Bulldoze + Helmet to skip over healing range the second time.

Both remaining Pokemon have Dazzling Gleam (back-of-the-envelope power check of 160 to Tyrunt), so it's up in the air who comes out next--Mr. Mime. Fine. I might as well sack Tyrunt here anyway, which they oblige with a Gleam. Next up, my goal is to get as many Poison Jabs as I can with Chespin. In ground state it'd be a 2HKO, but...yep, that's not happening, Mr. Mime starts with what it's best known for and sets a Reflect, so Poison Jab only deals about 1/3. Mr. Mime has a 2HKO of its own once it starts attacking, but the second Poison Jab lucks out and causes poison. Now if nothing else, the chip damage will happen even if Chespin gets KO'd next turn. But wait--Valerie uses a second Hyper Potion instead, meaning one more Poison Jab! Now of course nothing stops the second hit for a KO, but Chespin has done its job.

Golbat still has Protect, and not only does that move rack up an extra turn of poison damage, it also wastes the final turn of Reflect. Acrobatics is now enough to KO, and we get to deal with Sylveon in its place. Golbat can take at least a couple hits here, though it can also get itself Cute Charmed because...sure, even though an NPC in town explains the Pixilate ability, Valerie must never have heard of its virtues. Oh well, it can't Cute Charm anyone else on the team, and either Snorlax or Bulbasaur can manage the rest. Snorlax could use the experience more, so in you go. Body Slam until the floor starts to crack, I guess. This section was...really short, so how about we keep marching on?

Badge Checkpoint 7

Since the route east is blocked by someone who wants me to pay P5 million to join Team Flare, and I don't have that kind of money, all I can do is get caught up in the Just-Us League's business. Everyone's checking out the Poke Ball Factory north of town, and with Shauna distracting the door sentinel somehow, we can sneak inside, whatever good that's going to do.

Calem actually proves useful here for once, as there's a Flare goon just inside who funnels me into a challenge no matter how far left or right I try to cross, but he picks up the block and takes care of that battle instead. No telling what that was going to use.

And even better, it's as though Game Freak is listening to complaints about a linear path through an area where every trainer is unavoidable, and reacting fast enough to change things up mid-playthrough. In here, there are no mandatory trainers until the very end. Just ride the conveyors until I can go up the catwalks, flip the switch, ride the conveyors the other way so I can reach a portion of the upper floor that's blocked by a trainer, and poof!

All we have in the final room is a generic "Admin"--sure, a weak Scraggy who gives me a nearly-free opportunity to get Golbat situated, then a Houndoom that they still don't know how to use (heck, even if they just switched up the order so Houndoom was in the lead, that'd make Beat Up a 2-hit move!) And then a multi battle with Bryony and Celosia, where Celosia's bringing something new: Manectric. As Liepard and Meowstic fill the other two slots, it's time to hit 'em all with Bulldoze, of course! In a much different experience than Ultra Sun brought, I haven't been able to avoid seeing everything my partner has, so if friendly fire results in a KO on the lead Meowstic (or, more likely, if Liepard deals enough on its own) that's still okay. Such is the case here, and with the freedom of making it essentially an 8v2, the slight level disadvantage isn't a problem at all. The company chair is so happy with this new approach to driving out hostile takeovers that I get to point to either a Master Ball or a Big Nugget, but only for the purpose of pointing because I get to take both items with me either way.

This also removes the blockade at the gatehouse, letting me go on to route 15 where the main obstacle is not getting too close to the piles of leaves that hide trainers. What I'd really like to do here is head into the Lost Hotel--too bad, there's a Hex Maniac blocking the line to enter the ruins and I can't battle her. But fear not: instead, I can turn a bit south onto route 16, and pick up the Lost Hotel's other entrance which has nobody guarding it!

What I'm looking for here is the opportunity to fill out the team with a Magneton, which was so graciously cleared for use by Clemont (how convenient, as catching it at Magnemite stage is both impossible and illegal if it were possible). It'd be nice to have a special attacker for once, and a Psychic resist, and so on. In particular, the type synergy between Golbat and Magneton is something I've appreciated for a while. Even better if they both have pivot moves, but unlike in Alola we don't have access to them yet--in fact, Volt Switch is off limits all the way until the Battle Maison. Of course I have to reset if an Electrode, Litwick, or Klefki shows up, which is just par for the course when it comes to tracking down new team members in Dexit. When I find one, I could simply go for the Quick Ball, but no...what I really want is to check for Sturdy, so here's an Expert Belt Bulldoze. If that KOs I still have to reset...good, Sturdy. And with that I even have someone who can put the Thunderbolt TM to good use, it's sure better than Electro Ball.

Getting back on track, Dendemille Town is right through the gate, and with it the all-important Move Deleter so I can finally get rid of Surf on Snorlax and Strength on Tyrunt. But first, an all-important interruption from Sycamore and Dexio (no Sina this time?) to inform me that...Xerneas exists. Wow, who cares. I also need to head up to Frost Cavern because the Mamoswine that enables further eastward travel is somehow preoccupied with something up there.

There's a sizable gap in levels between route 15 and Frost Cavern, and with my highest level currently being 39, Repels can only block 20% of the encounters here (any of which will force a reset). It doesn't seem too bad, though, as Flash works in here, and the encounter rate is 0 as long as I'm on icy floor. There's one tricky spot where I have to do a little diagonal shuffle to avoid triggering a Battle Girl; other than that no snags and no battle all the way up to the final room. Two Flare grunts are hiding here, and Trevor decides to take one (what, is he going to challenge them to a Pokedex battle?) and leaves the other to me, giving Magneton a chance to see its first action. It's against...Golbat, sure that's an easy one. Behind that there's a Manectric which...neither of us do much either way, but Manectric probably wins the race based on early returns. Time for Snorlax, and I have no idea what Manectric was thinking with Odor Sleuth on the switch. The next turn I even get a QC Bulldoze, leaving Snorlax with full health! Sure, why not.

This gives way to another sizable jump. Thus far in the game, I haven't faced any Pokemon above level 42, until Mabel comes along and makes a press all the way out to 48 with her solo Houndoom. At this level it's not going to waste any turns with Beat Up either. I have to see what Snorlax can do, mostly...Bulldoze chunks it, but Houndoom managed to pull out the burn with Fire Fang and they're not dealing as much as I'd like. Since I don't want to switch and give Houndoom a free hit, I have to let Snorlax take the fall after 2 Bulldozes. Now Golbat will be faster than Houndoom...but in fact with two of them, Magneton is also faster than Houndoom, and it can survive a Fire Fang even from 10 levels down and with Sturdy chipped away by Golbat earlier. So let's do that. The experience is enough to bring Magneton up to 39 and get Flash Cannon, which is certainly a welcome addition.

Talking to Abomasnow thankfully doesn't count as seeing for the dex, but the reward is a worthless Abomasite. It might as well be invisible--it didn't even exert its influence to use Snow Warning so the Team Flare fights would have taken place in hail! As long as it's un-smellable to Mamoswine too...sure, let's get out of here.

By Route 17, we're back to the wilds being high enough level to ignore my Repels. With the forced Mamoswine ride as well, process through the route is glacially slow (pause for laughs) given the apparently-higher encounter rate in the deep snow, and the inability to safely encounter anything without resetting. Needless to say, a lot of updating the save checkpoint happens during the trek through the snow.

On the sunny side, after that's all over we get to go to Anistar with its famous sundial. The answer to "Where's Sina?" from before gets sort-of answered here, with her arriving in town just after me, unaccompanied by either Dexio or Sycamore (or, as far as I can see, a Mamoswine if there's only one to cover all of route 17). All she wants is to lend me some Repeat Balls and point out that there's someone around here who can tell me more about Xerneas--once again, a decided "Who cares?" moment. There's also a call from Calem on the Holo Caster, saying he wants to challenge me yet again, outside the gym just like with Ramos's gym. As has become this region's tradition, I once again have to win if I want to be allowed in the front door at all, so...sigh, oh well.

As always, the lead is Meowstic, and the opening exchange goes Fake Out-Rocky Helmet. In a show of mercy, apparently, Meowstic still has Disarming Voice as its fairy move, which only deals about half to Tyrunt...but with its level edge (and Tyrunt's unimpressive stats, which are really getting to be a drag by now), it has just enough to hang on against Crunch in return. Despite being super effective, Disarming Voice is weaker than Psychic now, and Psychic is clearly in KO range even if DV is more borderline. I'd like to keep Tyrunt around for later, so first a switch to Magneton, then a predictable freebie to Snorlax on Shadow Ball, the only unresisted move Meowstic has against Magneton. (Golbat is just a bit too slow to get the jump on Meowstic yet, and isn't an option even if I could switch it in safely.) From this low, Snorlax only needs one good hit, easy enough.

Delphox now has a moveset that at least ensures it'll stay focused and won't waste time: Flamethrower, Psychic, empty slot, empty slot. Everyone except Snorlax and Tyrunt is weak to at least one of those moves, and I'm sure Tyrunt is too low on health to take another Psychic, so it's all up to Snorlax to hold the fort. Or at least slow them down enough and deal enough damage that Golbat can finish with Acrobatics, I guess that'll work? Although Calem has a team of 4 now, and goes for the newcomer: Jolteon. I know Golbat's not going to outspeed that, so let's try...hmm, how about Magneton, the great teamwork I know those two can have. Jolteon actually has Double Kick but evaluates it using only the damage from one of its two hits, so that it considers the NVE Discharge as its best option (SE Double Kick rates as 60, as does STAB Discharge, but the special move takes advantage of its higher stat and Magneton's lower one). A few exchanges of Discharge and Flash Cannon make it clear that Jolteon wins that race (as I'm sure is the case for a lot of races it gets involved in), meh.

A good point for doubling up grass starters is that they really reinforce my ability to stem the bleeding against an opponent like Jolteon, even with obviously NFE stats. Chespin would almost certainly win the matchup with a weakened Jolteon anyway, barring paralysis from Discharge into some FP turns. But it's pleasantly surprising to have the critical pop up and only have to take one Discharge before Absol shows up. Although...it's Absol with Snorlax already down and Tyrunt weakened, so it might be a bit tricky. Let's see if I can get Leech Seed going...the good news is yes, the bad news is Absol used the turn to go for Swords Dance, which I believe makes Night Slash a guaranteed KO on everyone I have left. Not to give up hope though, as I can switch Tyrunt in for a sack and at least get Rocky Helmet out of the deal (but no Leech Seed on the same turn as a KO). Now that Golbat comes in safely, I do get Leech Seed on Protect turns, so: one of those, switch to sack Chespin, Golbat Protects again, switch to sack Bulbasaur and make it 1v1, another Protect from Golbat, and finish this off by wasting a second turn with Fly. Now as long as I don't run into that 5% miss chance...good, that does enough, and Calem even gives me a heal right afterward to save me the trouble of going back to the Pokemon Center.

Olympia's Superplexus-like gym really only has a few forks in the road, and none of the "blind voyages" toward the screen or otherwise will stick you into a battle you can't see coming without having a chance to back out. There is one unavoidable battle along the way, against a solo Exeggutor--which we already saw in the last battle before Ramos. I ended up fighting this one out of position: Snorlax took a Wood Hammer, Rested on a second one, and ended the battle asleep after a handoff to Golbat. I could fix the sleep with a backtrack out of the gym and to the center, but as unobtrusive as the gym's maze is, I have a plan for Olympia in which the sleep is even less of a hindrance than the gym layout. With no one above level 40, the level gap is about what I would have expected before starting the run, despite a creeping cynicism that came up around Korrina and especially Clemont that they wanted to make sure we would play enough battles to be caught up by force.

That plan begins with Magneton against her Sigilyph. We can tank at least three Psychics, more probably four (unless there are criticals or SD drops in the way of course), which means the damage output is unimpressive and Sigilyph will strongly favor doing what it was designed to do: set screens. Meanwhile, Magneton gets a bunch of time to spam...Flash! Magic Guard prevents Leech Seed from doing anything against Sigilyph (more pragmatically, I figure Air Slash prevents it too by KOing the setters before they can ever use it), but stat drops are totally fair game. Sigilyph hits its first three shots despite the accumulation of blinding flashes, not that I care, and the full set of 6 Flash goes up, at which point Magneton's contribution to the battle is complete.

The rest of the battle should be well under control for...Snorlax. You see, Snorlax can learn this neat move we haven't seen in a while: Power-Up Punch. It does next to no damage against Sigilyph, but we all know that's not what its goal is. In fact, the better to keep it around passively. Nothing on Olympia's team has a fighting move, meaning she has no eligible resist switches on PUP, so Sigilyph and its -6 accuracy will be sticking around until we forcefully move them aside. That's a ton of free turns to wake up from the preexisting sleep, go for attack boosts, and even go back to sleep on the rare occasions that Sigilyph not only attacks but also manages to hit. Even after +6, we can afford to go for a few more PUPs just for the tiny bit of chip damage, because it looks like +6 Body Slam into Reflect deals about 75% at the low end and my goal is to leave it right around there for a while. The other objective is to count off Air Slashes to get to 15 and be safe in the knowledge that Sigilyph is completely out of attacking PP and Snorlax can stay at full health for a while. Finally, the last thing on the to-do list is keep track of Reflect turns: to avoid complications, the KO hit should come on the same turn Reflect is scheduled to expire. Slow, but thorough: that's always been the Snorlax Way.

Slowking doesn't have the -6 accuracy to deal with, but it is facing down a +6 Snorlax at full health with no Reflect to cushion the blow. Naturally, its move is to go for Yawn. Hey, points for teamwork there: after Body Slam blows Slowking away, Meowstic is last and makes sure the sleep kicks in by using Fake Out before I can do anything else. Neat as it may be to see something that ends up resembling long-term planning from the AI, Meowstic doesn't hit hard enough to KO Snorlax before the wake-up turn, and overall that goes down as a pretty easy gym battle even if, turn-wise, it was the longest one yet.

And there, this segment was no runt like the 5->6 "stretch" (more like a yawn, really) was. Like the Calm Mind TM, now we can calm down for a bit and cut the post here.

After 7 Gyms
Central Kalos Seen: 36 (Owned: 6)
Coastal Kalos Seen: 29 (Owned: 1)
Mountain Kalos Seen: 4 (Owned: 1)
Current Team -
2020-10-20_21-43-12.955_bot.png

Chespin L41 (Leech Seed/Growl/Seed Bomb/Poison Jab)
Bulbasaur L41 (Toxic/Leech Seed/Growth/Grass Knot)
Snorlax L39 (Body Slam/Rest/Bulldoze/Power-Up Punch)
Zubat L39 (Protect/Acrobatics/Bite/Fly)
Tyrunt L40 (Rock Tomb/Dragon Claw/Crunch/Charm)
Magneton L40 (Thunderbolt/Flash Cannon/Metal Sound/Flash)
 
Last edited:
After a hiatus of over a year, in which I was able to patch up the memory hole starting with Black 2, then Platinum and a bunch of Japanese games, I figure...there's a ribbon quest (and then some) under way in those games, and I might as well finish up this run and then use X as a landing spot for the team there. So let's get back to it.

Obligatory Baddy Bads Interlude

The next stop is back to Lumiose City, where the blood-red Cafe Lysandre has been acting pretty..."sus," as the kids now say. Really, it looks deserted except for a couple servers standing around. This part works more like the Rocket HQ from Johto than the Shady House in Alola; just remembering how it works from a previous playthrough won't cut it--you actually need in-character knowledge which can only be obtained by beating the pair, one of whom tells you about the secret door, and the other gives away the password to open it. This means I have to take a battle with Scrafty, bleh. At least it's easy.

Once I can properly recognize and open the secret door behind the cabinet, it's onward to the maze floor. But first...we get stopped at the entrance by Lysandre, who springs out a battle to kick things off. The lead here is an unevolved Mienfoo, and because it's unevolved, its HJK is too weak to KO Snorlax. Indeed, it doesn't even try, pulling out Swords Dance instead while Body Slam deals more than half. Now the attack is strong enough, but Snorlax came ready here with Protect, blocking the hit and making Mienfoo finish itself off with crash damage.

Lysandre points to Gyarados next, getting an Intimidate if I had any care about staying in. Maybe staying in isn't the best idea, then. Switch to Chespin to take an Aqua Tail, and now sack it off while Gyarados goes for its only move that's strong enough to KO: Outrage. This means it's now locked into Outrage for at least one more turn, and is therefore unable to pick Earthquake while Magneton comes in and does what it does best.

Taking only an Outrage means Magneton is pretty good on health, compared to if Earthquake left it on Sturdy, but Pyroar can do more than enough with its Fire Blast even from here. So instead, Bulbasaur (who's not needed against this team) gets to be sack fodder just so Snorlax can come back at full health. It needs 3 hits to beat Pyroar with Bulldozes or Body Slams (which are about the same power), while even Rivalry-boosted Fire Blast with Pyroar's 7-level advantage also needs 3 hits, but when Body Slam gets the paralysis, that means even 33 speed is enough to go first on that crucial third turn, and win. Last up is Murkrow, and Magneton has enough health left to easily wall everything it has, finishing off that easy introduction to his team.

Now that this battle is over, we can proceed onward into the proper maze of spinner tiles and teleports. So there's one guy guarding the first teleporter, and then Aliana standing in front of two more. She has a Druddigon now, which spams Dragon Claw against pretty much everything, but we have enough firepower to wear it down. Once she moves aside, we can go further, including the sleeping room (with a TM12 gift inside, not sure how useful that'll be), and a room with masked Sina and Dexio inside. There's also one grunt who brings something new to the table: Toxicroak, which shudders for some reason...against Snorlax. Apparently it doesn't even have a fighting move, preferring such combos as Nasty Plot into...Sucker Punch. Well, I can see why it was so scared.

Another one of the side rooms offers a double battle against Bryony + Celosia, and this time they add Bisharp and Drapion to their teams, but the nice thing is that it's an optional battle, so I just don't do it. No such luck against Mable: she has the elevator key, so I have to fight her. Tyrunt doesn't quite have a OHKO on her Houndoom with Rock Tomb, but after Foul Play into the Rocky Helmet, the chip damage means that one hit is now enough, bringing out her respective newcomer: Weavile. The bad thing here is that Tyrunt is low enough on health that Weavile can take the KO with non-contact Ice Shard, but since Weavile is quite obviously faster than Snorlax, Low Sweep is discouraged and it just keeps spamming Ice Shard while it gets 2HKO'd by Power-Up Punch.

At first, the elevator only goes down one floor, where we find AZ locked up in an electric cage, ready to relate the anguish he's been living with for the past 3000 years. Only after that cutscene do we get to go down another floor and battle...no, not Lysandre again, just Xerosic. He finally sends out Crobat, which of course gets dominated by Magneton, and then it's up to Malamar which just does the same, predictable trick as every Malamar ever. I'd rather keep Magneton around, so: sack Tyrunt on a switch into Superpower (and chip with Rocky Helmet), then Chespin survives a +1 Superpower long enough to make Leech Seed stick, and the clock is now ticking. It doesn't tick on sack turns, but I don't need any more of those. Golbat switches in on +2, +3, and +4 Superpowers, Magneton takes a +3 and +4 Psycho Cut, and still that's not enough to KO either one. Pity I don't have U-turn here to add some damage to each pivot cycle, but...once Golbat is in for the last time, it only takes one more Leech Seed turn to drain the last of Malamar's health, and Fly makes sure of that. Golbat levels up to 43, and because we've now seen Crobat, I can go ahead and let the evolution play out!

Behind Xerosic is an obvious poisoned-wine-glasses situation, except it's ominous colored buttons on the wall because...they were hoping they could shunt the legal responsibility for their "ultimate weapon" to somebody else, like some NFT dealer trying to get rid of the bag before it's too late? Anyway, much of Geosenge Town gets uprooted, and now we have to get back there. Fly is not strictly necessary for this in a normal run, but it is necessary in Dexit: Team Flare blocks route 10 at this point, and while route 11 is left uncovered, getting there either requires flying directly to Geosenge anyway, flying to Shalour and going backwards through Reflection Cave (what's the point), or taking the long way through Coumarine. This means going west on route 12, but there are trainers on route 12 that were only bypassed before because they ignore Skiddo riders, and there's no way to pick up a Skiddo at this end...tough luck. Guess we're flying.

Since there's not much around anymore, they must have felt like the signpost trainer on the path to the team's other secret base was necessary to point out that path exists...luckily, he uses Manectric/Scrafty/Golbat and not anything new to the dex. After that nuisance, we can all head in, down the long elevator shaft, and meet Lysandre 2, so soon after the previous one. Now his Mienfoo has evolved into Mienshao, but since Golbat has also evolved since last time, I decide to lead with that and KO with Acrobatics. Other than that, the strats are still the same: bait Gyarados into KOing one of the grass starters with Outrage so Magneton can come in and get a move in safely, outpower Pyroar with Snorlax (Pyroar even has Unnerve now instead of Rivalry, making its attacks that much weaker), and get back to Magneton to zap the newly evolved Honchkrow back a year or three thousand.

Now I can look town through the window to find a perfectly inconspicuous tree growing happily in this underground chamber, so it might be worth getting down there. Along the way, Calem accompanies me for a trio of multi battles against boring opponents we've already seen. Unusually, despite being multi battles, there is no auto-healing after each one...except that if your entire party wipes out, and Calem has to finish the opponents off with his team, you do get healed in that case. (They don't want to bring back the all-fainted-Pokemon glitch that was possible to achieve in Japanese B/W, I see.) This winds down all the way to the bottom of the stairs, where I can enter the tree's room only to find progress blocked by 6 Flare Grunts and Admins, a number which quickly disperses to 4 as Shauna and Calem both consign themselves to being chase fodder for a couple of them. Also fortunately, these trainers again use Pokemon I've already seen, so the Pokedex remains at 80 seen...for now. After beating them all, I get to press another ominous button and...surprise, that's not a tree at all, just some Pokemon's antlers. Who ever would have guessed?

Xerneas promptly gets a turn 1 Quick Ball, and that's the last we'll be hearing from it. Though it is rather goofy to credit it to the Mountain section of the Pokedex when it's obviously fought in a coastal region. And hey, being the Life Pokemon, it does at least give a full-party heal after battle, despite no visual indication of such.

After what must have been an exhausting battle to manage that, our chasees come back with a look of surprise that Minidex was able to befriend a legendary Pokemon. Really, I would have let Calem have it if it meant not taking the dex entry, but plot is plot. And the last act of the Team Baddies plot is heralded as Lysandre comes in wearing some goofy contraption that looks like it came straight out of Clemont's closet. He's determined to seize Xerneas right back despite it being secure in the PC, and somehow that's supposed to let him use his weapon? Whatever. It's (almost) the same team as last time, no new dex entries. Crobat vs. Mienshao goes down the same way, a very fast start.

The battle route starts to diverge after Mienshao drops, though. Lysandre 3's team is flagged to take the last Pokemon (Gyarados) and make sure he never sends it out unless there's no other choice, so while Gyarados came out second in the previous battles, this time he has to send out Pyroar instead. Once again it has Unnerve, which is worse for Crobat than if it had Rivalry, but I go ahead and leave it in for a turn to use Acrobatics, then switch to sack Bulbasaur to a Fire Blast and bring Snorlax in, now needing only 2 hits. The first Body Slam doesn't paralyze, so Snorlax also takes 2 Fire Blasts in the process, but still ends up around half health.

Honchkrow now has Super Luck (it used Insomnia last time), meaning a big 50% critical rate, and again Body Slam fails to paralyze with 2 Night Slashes being enough to KO Snorlax. Even Magneton takes a critical Night Slash for over half before the finishing blow, but that might just be me used to having Eviolite when this run can't unlock it yet because the Pokedex isn't full enough. Gyarados is now forced to be last, now capable of mega evolution to remove its double weakness, and even if I tried to heal up to full, EQ can now ignore Sturdy.

Since I know Earthquake is coming, there's one play that stands out. No, not a switch to Golbat...instead, switch to Tyrunt for another sack! This is a non-contact move and doesn't trip Rocky Helmet, but I don't want it to trip Rocky Helmet. See, there was one good thing about that Flare grunt battle outside on the path to this hideout: in that battle, Chespin leveled up to 45 to get Pain Split. By making sure Gyarados hasn't taken any damage yet, I can send in Chespin after the KO, survive an Outrage, Pain Split the full-health Gyarados to maximize the amount of health I get back, and just manage to hang on against a second Outrage with 1 HP, allowing Leech Seed to go up as well. Now the rest of the battle is fairly routine: Magneton survives the third turn of Outrage, Crobat comes in to blank Earthquake (except Gyarados doesn't even get to use Earthquake, it's a confusion hit instead) and one Fly turn scores the last bit of Leech Seed drain, no need to come back down thanks to that confusion hit.

All Lysandre can do now is convince the ultimate weapon to use U-turn on itself, while we're able to make a hasty getaway out of the base and...huh, Trevor and Tierno finally show up, as do Sina and Dexio...er, the "masked heroes"! Planning to give some ideas to Kukui on your next vacation to Alola, are you? And as Shauna puts it, with this story arc done for, "Let's go back to Anistar City and start over from where we left off!" Over a year later, and no worse for wear.

Badge Checkpoint 8

Not much has changed in Anistar itself, but Sycamore shows up on the Holo Caster asking for a battle in Couriway Town, which we haven't even been to yet. To get there, it's a short trip down route 18, with no mandatory trainers and only short patches of grass. It's basically the filler section of the map, with an entrance to Terminus Cave that there's no reason to check out. I can also go to Inver's house here, but even beyond the minimum battles rule, the Pokemon Inver uses still count against the Pokedex so there's no reason to try an inverse battle.

Couriway Town is pretty much a filler outpost itself, though there is someone to give away a free U-turn TM at last. Before I can explore the southern end of town, Sycamore comes in to interrupt, thanking me for disposing of Lysandre and...challenging me to an unavoidable battle. Unlike last time, I can't get away with losing either, so it looks like we'll have to take all these Pokedex entries. And the worst part is, because the team goes directly from first stages to third stages, the second stages still haven't been unlocked, preventing me from being allowed to evolve the gift Bulbasaur after this is over.

The battle itself is pretty easy: Crobat starts with Acrobatics for about 90% to his lead Venusaur, leaving it low enough that I can take the KO with the new U-turn TM and get Magneton in regardless of who comes out next. It's Charizard (of course), who deals a bunch of damage which Flame Burst, but thanks to Sturdy there were no worries about a possible critical, or even Flamethrower plus burn, as Thunderbolt is a OHKO back. That leaves Blastoise, who tries to finish off Magneton with a Water Pulse but finds its effort shrugged off by Bulbasaur instead, then starts boosting the wrong stat with Iron Defense as even the unevolved starter is able to get a 2HKO with Grass Knot.

After that's done, Sycamore says I can look for his treasure hidden somewhere in town, but why bother. I do get access to the rest of town, where there's a guy looking suspiciously like Looker offering to sell water for P300 (I have to decline this since it's not a Repel or a permanently sold-out item), and in the hotel, both a TM for Scald (which nobody can use) and, at long last, the Stealth O-Power. Way too late in the game to just now be picking this up, but I'll take what I can get.

Continuing on, route 19 has just one short mandatory grass patch (with purple flowers), and no trainers, before it runs into...a long bridge. Welcome to the Pokedex Explosion segment of the run. There are three consecutive battles against Shauna, then Tierno, then Trevor (who must have figured that challenging me to a Pokedex battle again was too easy, so it's the real thing this time). No healing in between the first two (in fact, no switching my lead either, unless the old one faints), and no taking the easy way out by punting a loss early on--in fact, if I lose any of the battles, I have to start over against Shauna again. It's like having an over-doting aunt, plus two uncles, all in one place.

Shauna starts out with Delcatty, who's mostly harmless: it wants to Charm Magneton pointlessly while Thunderbolt is a 2HKO that doesn't care about that stat. She follows up with Goodra, who does have a threatening Earthquake, but still easy to manage: switch to Crobat and nullify one of them, U-turn to Snorlax, and now Earthquake is only a 5HKO against Snorlax...while its other moves, including Dragon Pulse, are no better. I won't be able to put up a Belly Drum safely, but what I can do is keep using Rest, stalling out the Earthquake PP until it's all out and has to use other moves. For this gauntlet, Snorlax is holding the Rocky Helmet, so what I really want is for Goodra to pick Body Slam enough times that it impales itself out of the battle, and slowly but steadily, that's what happens. Now her fully evolved starter (Greninja in this case) is last, and...it wants to spam Double Team. Extrasensory doesn't do nearly enough damage to be threatening, and Double Team isn't Minimize (as Body Slam is one of the moves that gets to "prey on" Minimize, ignoring the evasion and even dealing twice as much damage), so Greninja gets lots of DTs, but I can keep trying Body Slam and only need to hit twice before Greninja drops.

Shauna parts by saying it reminded her of the battle in Aquacorde Town, but of course that was just a simple Vine Whip 2HKO and it's over, nothing like PP stalling or Rocky Helmet damage so I don't see the resemblance here. Anyway, this sets the stage for Tierno to run in, or rather fly in with his lead Talonflame. This doesn't actually have a Fire move, and can only use Acrobatics for 21 damage to Magneton on a critical before it gets shocked out of the sky. Crawdaunt next...yes, it turns out Bulbasaur can tank both Crabhammer and Night Slash, but Grass Knot doesn't do enough damage, so I end up switching to Snorlax and settling for the double KO as Crawdaunt finishes itself with Rocky Helmet recoil. Last up is a Roserade with Petal Dance and three empty slots (in keeping with his dance theme), but against Crobat it doesn't even get to use that.

Finally after Trevor heals both of us up, he asks to challenge me for himself. The lead Raichu is pretty much a stalemate for both sides, but rather than attacking with Thunderbolt, I decide to put up Flash a few times, with the aim of switching to Tyrunt on a free turn because of a hopeful miss (which pays off) and Earthquake manages to OHKO. That prompts Florges to appear with that really tempting Moonblast...hm, I can let Crobat take that, U-turn to Bulbasaur as it goes for Misty Terrain, Leech Seed against Confide, and then I need to "waste" one more turn with a weak Grass Knot. The point of wasting a turn is that now I can switch in Snorlax, and Belly Drum on the last turn of Misty Terrain, with the hope of being able to successfully Rest a turn after that. Unfortunately, Florges proceeds to put Misty Terrain right back up to make Rest fail (rather than going for a third Moonblast), but at least I do heal up a bit with the Leech Seed drain, enough to survive one more Moonblast and KO with Body Slam.

Snorlax conveniently leveled up to 50 of this KO, just in time to learn Heavy Slam for the promising target in Aerodactyl who comes out last, but Misty Terrain has an even less convenient side too: it doesn't block confusion until Alola, so despite the terrain, Aerodactyl is able to fire off a Supersonic, and pass the accuracy check, and get the immediate confusion self-hit for a KO. Guess Magneton will have to finish off, which thankfully isn't hard to do, as either STAB would be good enough.

After eight new Pokedex entries in the span of three battles (11 in the last four, counting Sycamore), Shauna apologizes for the bloat with HM5, even though none of my team can use it. The more important thing is they leave the bridge, so I can keep going to Snowbelle City. Home of...the last clothes shop, that's something. The Frenzy Plant tutor, which neither of my starters can use. And a gym that's off-limits, because the gym leader is away somewhere. Well then, guess we're going down the winding woods of route 20 to bring him back.

I figured this would be a good time to try out the new Stealth O-Power, so put it up and...promptly had the level 50 Crobat get ambushed in battle anyway by a very suspicious level 49 Amoonguss. So okay, not only is it given so late in the game, it doesn't even work properly? In Alola, if you recall, the Roto Stealth worked 100% flawlessly, even if you don't outlevel the wilds. This is inexcusable...but all I can do about it is reset, just the same. A second try manages to get through all the mandatory grass just fine, and there are no mandatory trainers on the route, so we can emerge on the other end to find Wulfric feeding some Furfrou and Fletchling. As long as he doesn't try to force them to battle me...okay good, he's content with going right back to the gym, no need for any more quests. And since we've already established that the Stealth power isn't foolproof, there's no reason to play around with looking for items through the flowerbeds of the village, so I can just fly back to town too.

This gym is the notorious rotating-switch-drum puzzle. All four switches are mandatory to use, and getting to each one for the first time requires a mandatory trainer battle, and the four trainers use nine Pokemon in total, all of which are different and none have been previously registered in the Pokedex. So let's give a big round of boos to these teams, as Sneasel and Cloyster; then Delibird and Mamoswine; then Cryogonal, Piloswine, and Jynx; and finally Beartic and Vanilluxe; all forcefully introduce themselves. I basically have to fight them with half the team tied behind my back, as two unevolved grass starters plus an unevolved dragon fossil does not sound like the recipe for success in the ice gym. There's a somewhat puzzling moment where Magneton manages to go first against Jynx, but at that level it apparently has the negative-priority Avalanche, and decided to pick that instead of Wake-Up Slap for...reasons? I'm not the one who decided to become an underling of the ice gym, I couldn't tell you.

Finally I can reach Wulfric, with his totally original lead Abomasnow. I actually let Crobat start this one to use Acrobatics; we should and do survive an Ice Beam, while Acrobatics dealt...looks to be around 70%, that shouldn't be in healing range. And since Abomasnow has Ice Shard, staying in to finish them off (even with U-turn) won't work. Instead, let's try something tricky: the three Ice-weak Pokemon that I said were tied behind my back earlier...this could be a chance to get them some extra experience. So one by one, they all switch in on Ice Shard, take more than half, then get out of there before the second Ice Shard can finish off. The last switch-out goes to Snorlax, with Snow Warning conveniently expiring that same turn. One Ice Beam is all it gets, unable to fish for freeze as it gets chopped down.

At last there's a repeated Pokemon in the gym, with Wulfric having Cryogonal and not adding to the Pokedex immediately. Because hail ran out, they really want to set that again, which is a waste of time: even though Cryogonal is pretty heavy, it still takes 80 power from Heavy Slam...combined with that pathetically low defense stat, it's enough for a OHKO. Avalugg, on the other hand, is even heavier than Snorlax (taking just 40 power) and its defense is anything but pathetic...still, it does have a weakness on the special side. Combined with not even having Sturdy, that means ample time to switch to Magneton and OHKO with Flash Cannon. Like he foresaw, pretty much a pushover.

With 8 badges, and no more funny business to police around the region, all that's left is setting out toward the league. Even this task does have a bit of a choice to make, though. I can either go west right here and get to Victory Road from route 21, or fly to Santalune and go through the early-game route 22 instead, which is finally not blocked at the other end. This latter choice is, however, blocked: try as you might, there's no avoiding a trainer on 22 who brings Psyduck and Litleo. Meanwhile, 21 has only avoidable trainers (including a double-battle pair who simply let you walk behind them, no need to deposit down to 1 in the PC) so that's where we're going. The Victory Road gate itself has a mandatory trainer in lieu of the traditional "check your badges and do nothing else" attendant, but he can wait for the next segment. Which won't take nearly as long to come out.

After 8 Gyms
Central Kalos Seen: 50 (Owned: 7)
Coastal Kalos Seen: 33 (Owned: 1)
Mountain Kalos Seen: 20 (Owned: 2)
Current Team -
2022-02-26_16-16-21.543_bot.png

Crobat L52 (Haze/Acrobatics/U-turn/Fly)
Chespin L52 (Leech Seed/Growl/Seed Bomb/Pain Split)
Snorlax L52 (Body Slam/Rest/Heavy Slam/Belly Drum)
Bulbasaur L52 (Toxic/Leech Seed/Growth/Grass Knot)
Magneton L53 (Thunderbolt/Flash Cannon/Discharge/Flash)
Tyrunt L52 (Earthquake/Dragon Claw/Crunch/Charm)

PC Box -
Xerneas L50 (who cares)
 
Last edited:
Victory Road

So as I was saying, the badge checker is in fact Ace Trainer Robbie, who starts things off with a battle. Carbink begins by going for Stealth Rock, which is at least a productive thing to do while it gets obliterated by Heavy Slam, then he sends out...Raichu, which I've already seen before. Get to Tyrunt so I can Earthquake it, resisting Thunderbolt in the mean time, and bleh, it's another newcomer in Kingdra. Might as well leave Tyrunt in for the sack, that way Crobat gets in relatively safely and even after taking 25% from rocks, the non-STAB Ice Beam isn't enough to KO, meaning I get to use both Acrobatics and U-turn to wear it down some before Magneton finishes the job.

After a quick heal and run back here, we're now free to explore the cave complex itself. First off is an Ace Trainer who reuses Weavile (a solo L60), obvious Heavy Slam bait there but Weavile does have coverage of its own in Low Kick to do a big chunk to Snorlax first. Fortunately not 100%. Shortly after her, we arrive at...mandatory water. Hm.

Of course, I could re-teach Surf to Snorlax as an option to get past this. It'll end up being deleted in favor of some physical move again by the time we get back to the league proper, but in the mean time its moves will be hobbled for the rest of Victory Road. Or...I could finally deprecate one of the grass starters and get a dedicated Water-type for the home stretch, maybe even take advantage of Waterfall. Looking through the list of encounters I've been forced to take so far, the most promising one is Gyarados, with Crawdaunt also existing as a 5% encounter in the same places. Cloyster is not only a 5% encounter, it's also exclusive to Y so I can't use that. Looking over them all, the main thing that sticks out is that while I can easily get the Super Rod, all the encounters it hooks in are level 35 (except in Mountain areas where it draws in species like Basculin and Poliwhirl, which aren't allowed), leaving them way behind my team in the 50s. Even with Exp. Share and Lucky Egg, Victory Road won't be nearly enough to catch up with the rest of the team. Oh well...guess Snorlax is on Surf duty again.

After that little pool, there's another trainer who can be avoided, but only by breaking a Rock Smash rock. So someone has to learn that TM. A quick venture out into some fresh air, watch out for the overhead shadows, and then back into cave #2. This now features the little pillars you hop between, which at least seem to prevent encounters, but after dodging more trainers, there's...a Strength rock. Yet another move someone has to learn so they can push it across the floor to fill a hole. At least the O-Power Stealth has been holding up, preventing any wilds all the way through cave 2, and in the next open-air section, the next mandatory battle is...no, despite there being a Pokemon Ranger standing ominously next to some ruins, they don't actually battle. Just to the right of that, it's the seventh Calem battle which he's been promising all this time. And no, losing isn't an option.

As usual, lead Meowstic loves to use Fake Out, even using the move on an Inner Focus Crobat, so I can slow-pivot to Tyrunt. Now Meowstic has Disarming Voice again, which is super effective but so weak that Psychic would still be stronger even if it didn't have STAB. So it smartly picks Psychic instead, but that's survivable as the rest of Meowstic's health drops to Strong Jaw Crunch and urging out the one newcomer on the team, Altaria.

Not only does Altaria come with Dazzling Gleam which is much stronger than Disarming Voice, it also comes with redundant "coverage" of a STAB Dragon Pulse. Either move is clearly strong enough to KO Tyrunt, but instead I get to switch to Magneton and, with Altaria now likely to pick its only other move (Confide) at least once, Snorlax can come in without taking damage on the switch. Finally, a chance to get away with Belly Drum followed by Rest, even with a critical Dragon Pulse in the first two. Confide all you want, you're not doing anything about that stat. I decide to keep cycling Rest until Altaria runs out of Dragon Pulses, as three Pulses leave Snorlax around half health when it wakes up, but if it's only choosing between Dazzling Gleam and Confide at random, I can get away with even more health left. 2 Confides and 1 Dazzling Gleam on the following cycle means Snorlax is around 80% when it wakes up to KO with +6 Body Slam, which is fine. Delphox gets a special drop with Psychic, and Jolteon plays into that with its own Discharge into the red, but both are annihilated by Body Slams. Absol is last, and with this little health it'll probably get the KO--sure, critical Night Slash, but Snorlax has already done plenty.

Back to Crobat, who has the 2HKO with Acrobatics, and Absol meanwhile starts with Swords Dance. That means the best it can get is a +2 Quick Attack, probably not even that, and it doesn't go for Quick Attack after all so it goes down without accomplish anything. I'll take it. I'll also take the Max Revives he gives in the aftermath, whatever good those do. After this battle is over and I can save, I notice there's also a Strength rock in this area that I can push to get to another cave entrance with another Strength rock that can be pushed to make a shortcut back, letting me get back here with skipping the first water section. As long as I can get back out with no encounters, that works.

But eventually we do have to move forward, and the next cave section features one more unavoidable trainer, right by the light at the end: Veteran Gerard. His Banette does avoid running into Tyrunt's Rocky Helmet, but does so by using Shadow Ball...special moves on a Banette? Some Veteran you are. The Leafeon behind it is hardly any more trouble.

Out in the next open area, there appeared to be a conundrum. A trainer with a fixated line of sight and who used Magcargo/Scizor, and the only way to avoid them was blocked by an overhead shadow where none of the possible spawns from that shadow were unlocked. Did I have to take 1 to avoid taking 2? Not quite, because it turns out the overhead shadows don't always spawn in their prescribed spots, and I could keep trying until it didn't. So once that pays off, the path continues out to become a pier, with the next cave entrance being in the water. Good thing I didn't delete Surf yet after making the shortcut back from Calem's area.

Finally there's the home stretch: a game of "Veteran Slalom" with three unavoidable trainers in a row, ambushing from one side then the other, and all bring new dex entries. Trevenant and Gigalith are due up first (hey, a chance for Grass Knot to do something!), then Glaceon and Snorlax (which would be another tempting Grass Knot target except that Leech Seed is even more useful against all that HP), and finally a trio of newcomers including an in-sync pair I'm plenty familiar with: Skarmory, Alakazam, and Umbreon. After Magneton gets the first KO without much resistance, I find out that Alakazam has Focus Blast for coverage because...of course it has Focus Blast for coverage. But thanks to a miss, I get to chip it down enough that U-turn KOs, leaving Bulbasaur to get in for free and ignore Synchronize as it uses Toxic on Umbreon to start the final countdown.

Just a few more steps to the exit, and I finally arrive at the safety of the league's designated Pokemon Center.

League Showdown

Now that I'm here, it's time to get prepared. Maybe I can enlist a last-minute newcomer...say, now that Gilles checked off Skarmory, I could go get a Skarmory from the Victory Road shadows if I wanted; maybe duplicating Steel and Flying types will prove more useful than duplicating Grass.

But no, there's one preparation to do first of all. Deposit everyone except Tyrunt into the PC, run directly to the league building, head into Drasna's room, and promptly get OHKO'd by Dragalge's Dragon Pulse. Wipe out, and lose P6600.

What was the point of that, though? The boldface text might be a clue. Yes, that late run of veterans ran up the Pokedex a bunch, but several of them used Pokemon from the Coastal section (including a bunch of Eevees), so at the exit to the cave, my Coastal seen count stood at 39. Seeing Dragalge en route to the wipeout makes it 40, which is exactly what it needs to be in order to fly back to Shalour and score the Eviolite. I can also pick up a couple more TMs and other items, and of course make that long-awaited trip to the move deleter so HMs aren't clogging up spots anymore (except Fly, which I could get around by catching a second Zubat, but why bother). I can't go buying items, but I do have...hm, 5 Potions, 5 Super Potions, 6 Hypers, a Max, 4 Full Restores, 5 Revives, 4 Max Revives, and even 4 Rare Candies which can work as mini Revives. That should be more than enough.

We're ready. Just in time for Pokemon Day.


Since Drasna already had her first Pokemon seen during the intentional loss battle, I might as well go there first. Indeed, that was the whole point of picking Drasna first (Siebold also leads with a Coastal Pokemon, but isn't as amenable to being beaten first with this team). The lead Dragalge is a lot less harmful to Eviolite Magneton than it is to Tyrunt, as its coverage gives nothing more compelling to do than spam Surf, and even a critical only deals about 1/3. That means I can put up Thunder Wave and a bunch of Flashes, to set the stage for the undoubted star of the whole Elite Four: Snorlax. All I need is a Belly Drum and Rest, and hopefully only get hit one or fewer times during the sleep turns. As long as that checks out, Snorlax is faster than a paralyzed Dragalge, and easily KOs with +6 Bulldoze.

Druddigon comes out next, and surprisingly Snorlax goes first even through Druddigon doesn't start with paralysis or any speed drops. What's happening here is that Drasna sees the +6 attack as the urgent alarm bell that it obviously is, and tries to get rid of those boosts with Dragon Tail. Too bad it doesn't matter if you don't survive long enough to use the move. Another Bulldoze wouldn't be strong enough, but Body Slam will even though it means taking a round of Rough Skin damage. Well worth it, especially as Leftovers heals back some of the damage.

Altaria can try to waste turns with Sing, or patch up its defenses with Cotton Guard, or sometimes even both. This battle falls under "both", but at least it only went for Cotton Guard once, as +6 vs. +3 Body Slam is still a 2HKO after waking up. Finally, Noivern usually doesn't have anything better than Dragon Pulse, but here it decided to go for Flamethrower and successfully fished the burn that dragged out the battle by one more turn. Doesn't matter, we're done with you anyway.

---

Malva's introduction to the league only plays on the first entry (which was the intentional loss), so she didn't show up in the lobby here. Only in the Blazing Chamber, which is where we're going second. Surprisingly, I'm content to leave Magneton out to lead here as well: Eviolite makes it bulky enough that her lead Pyroar's Flamethrower doesn't even get to Sturdy, so it opts to start with Noble Roar instead and that's enough to get the Thunder Wave down, followed by the Flash train so the first Flamethrower attempt is already down to 56% odds of success. After several more of those, not a single Flamethrower has managed to hit yet, so I can switch to Snorlax and...not only does it hit, it gets the immediate burn. This complicates the Belly Drum strat, so I have to Rest first just to get rid of the burn, then wake up to Belly Drum, then Rest again. Luckily nothing hits during sleep, so I get a +6 Bulldoze with full health left to tank the last three team members.

Talonflame is second and I can't Bulldoze that, so it has to be a Body Slam and risk of Flame Body. At least Talonflame picks Brave Bird, which has no burn chance, and deals a bit of damage before the Body Slam goes off without incident. Now Torkoal, as slow as it is, still outspeeds Snorlax (at least until it decides to pick Curse), and sure enough: Flame Wheel, burn, and survive the ensuing Bulldoze. For those of you keeping score at home, that is 3 moves used against Snorlax during this league run with a chance to burn, all three have successfully converted that chance, and all three burns have "mattered" in that the reduced damage would allow them to survive an extra hit at +6. Still, we plod on at a Snorlax's pace because none of it is insurmountable. I do have to spend yet another Rest PP, which gets chipped down by 3 more hits while asleep, and rather than cut further into the supply of Rests for the remaining 3 battles, I just go for another Bulldoze after waking up so I can move on to Chandelure. Flamethrower takes Snorlax down to 15 HP, but more importantly, it's finally a move that had a chance to burn but didn't get it. That's necessary to end the battle with one more Bulldoze.

---

Wikstrom gets to be third, and uniquely doesn't even wait for you to come up the stairs to the throne: he walks down to challenge you right there. (In the process, vacating the throne so I can steal it for myself if I had any plans to use it). His pathetically weak lead Klefki means more of the same: Magneton leads and throws out Thunder Wave and Flash, setting the stage for Snorlax to clean house...hopefully. Klefki succeeds in getting Spikes up, which are no big deal, but on the Belly Drum turn it also lands a Torment, which complicates things. Obviously it can't do much about Resting off the health loss, but Torment stays in effect for the entirety of Snorlax's visit, even if Klefki should switch or get KO'd. After waking up and getting the Bulldoze, followed by Leftovers, Snorlax is at 250/260, but now Aegislash comes out, Bulldoze is stale for Torment, and it's immune to my only other attacking move. Sounds like a disaster in the works...

...Or is it? For some reason, Aegislash loves leading off with King's Shield even though it already starts in shield mode and that effect of the move doesn't get shown off on the first use. And for once, there's a mechanical difference we can be thankful for: In XY, if you King's Shield and the opponent uses a contact move that you would have been immune to anyway, the type immunity kills the move first before King's Shield gets a chance to look at it, and there's no attack drop. (Starting in Sun/Moon, King's Shield is checked first and provides the stat drop without taking immunity into account.) This means that while I wait for Bulldoze to cool off, I can flout Wikstrom's choice of Pokemon by Body Slamming into King's Shield and staying at +6, rather than dropping to +4. Sure, Belly Drum would have done the same even with the updated KS mechanics, but where's the teasing in that? Now, thanks to Leftovers, Snorlax gets to be at absolute full health when Aegislash finally goes into blade form with Sacred Sword, dealing a huge chunk. But because it's in blade form, the newly freed Bulldoze does even more, getting a KO and bringing out Probopass.

Bulldoze is now stale again, but even if it weren't, I'd want to take the opportunity to Rest anyway. Probopass is too weak to deal 80 in one hit, but this isn't so much about Probopass as what awaits behind it. Snorlax can wake up to use Bulldoze which trips Sturdy; the nice thing about that is the obvious Full Restore turn means one more round of Leftovers, then with Bulldoze as the stale move for Torment, I have to Body Slam to break Sturdy, before one more Bulldoze no longer has to worry about the ability. Snorlax is at 180 HP after Probopass goes down and Scizor shows up last...could that be enough? (It's certainly more than enough for the Pokedex; all four of the opponents in this team register new entries.)

Not quite, it turns out. X-Scissor is doing upwards of 100 as the forced Body Slam start hits for just under 80%. It's enough to cause another Full Restore turn, and Bulldoze for almost as much, but even with the extra Leftovers recovery, Scizor can still KO with one more hit, and -1 speed isn't nearly enough to make it slower than Snorlax. At least it's low enough that Magneton comes in, takes some damage from Spikes, and that's it: one Thunderbolt does the rest. Wikstrom's defeated, and there's one more to go. (Well, two more of course. Maybe three. You know what I mean.)

---

I could revive Snorlax if I wanted to, but there's no need just yet. It doesn't really do much against Siebold's team, and I have another option. Because Magneton has avoided fainting all this time, it got enough experience from the first three battles to level up to 58. This means not only some extra stat points, but a jump point in the level formula. It's enough to make it worth taking off the Eviolite for this battle, and instead having Zap Plate.

In most games, the Elite Four are set up with IV tiers of 30 all around. Not so in XY, where they only use 18s even this late in the game. That makes their stats even less impressive for the level, and in particular, instead of this (which it would be with 30s):
Lvl 58 150- SpA Zap Plate Magneton Thunderbolt vs. Lvl 63 0 HP / 0 SpD Clawitzer: 164-194 (90.6 - 107.1%) -- 43.8% chance to OHKO
I get to look at this instead:
Lvl 58 150- SpA Zap Plate Magneton Thunderbolt vs. Lvl 63 0 HP / 0 SpD Clawitzer: 174-206 (100.5 - 119%) -- guaranteed OHKO
Isn't that convenient? Clawitzer, outsped and KO'd without being able to do any damage. That means Gyarados comes out second with predictable results: it tries to use Earthquake of course, but without the mega stone that just trips Sturdy (with or without Eviolite), and the return Thunderbolt snuffs it out quickly. That leads to Barbaracle, where I go ahead and let it fall to Cross Chop, and don't get a miss either.

Usually, Bulbasaur is able to get the drop on Barbaracle, with Grass Knot being a OHKO. That can't happen if critical Stone Edge hits and KOs before it can move, though. With Eviolite freed up thanks to Magneton holding Zap Plate, I could have given it to Bulbasaur instead and guarded against the critical, but didn't want to do as much item shuffling for the purposes of a video. That means it falls to the other grass starter, Chespin, as the next line of defense: no critical on X-Scissor, so Chespin survives with 18 HP, and then Seed Bomb does enough. I could have had Chespin learn Wood Hammer earlier, which would do about the same here except that it survives long enough to get some experience.

Anyway, Starmie is in last position, and this thing sometimes even bypasses taking a KO in order to set screens. Is that the case here? Sadly, no, so the wishful Seed Bomb repeat is in vain, and it's down to 2-on-1. Starmie has super effective moves against both of my team members, Siebold still hasn't used either Full Restore...let's see here: send out Crobat next, U-turn to Tyrunt on an obvious Psychic. About 1/3 from the U-turn, that'll work. Another "wish turn" to see if it shows mercy in going for screens: nope, Dazzling Gleam. 1v1 finale now, Starmie vs. Crobat. A second U-turn even though there's no one to switch to, just because that move will be light enough to keep Siebold out of healing range. Psychic, survive with 11 HP! Phew, good enough. Acrobatics to finish, making sure no low rolls can spoil the party.

---

I do have to use some revives for the finale, but they can all be done out of battle. I leave Magneton fainted, figuring the Diantha strat doesn't really need its continued presence, and full HP is a requirement for some team members but not so much for others. Here we go, it's all down to this.

Diantha's lead is the unquestioned warm-up part of the program. Hawlucha takes the OHKO from Acrobatics, might as well do that. This prompts her highest-power option against Crobat: Tyrantrum, with that huge Head Smash sticking out in the calcs. On the plus side, this means the next time Tyrunt levels up, it will finally be allowed to evolve (and as it's currently level 57, this comes just in time to actually learn Head Smash at 58 after evolving). But unfortunately, it's not to be right now, as I have to U-turn out to Tyrunt so the big guy takes both Rocky Helmet and a huge amount of natural recoil and promptly spends the next 3,000 years lamenting its existence. The turn after that is make-or-break: I want to sack Crobat to another Head Smash, softening it up with Acrobatics first so the recoil results in a double KO. But if Head Smash misses, Acrobatics will put Diantha into healing range, and since I didn't revive Magneton, Flash Cannon isn't available as a backup measure after that. Fortunately it hits, and we're down to a clean slate at 3-on-4.

After a double KO, the opponent's next Pokemon choice is based on the strongest move available against the Pokemon you used to have on the field, even though it's obviously no longer there. In this case, that honor goes to Aurorus with the promising Blizzard-Thunder combo. If I still had Magneton around, I could send that in at this point, and the crippling operation would be ludicrously easy: Magneton is one of the few Pokemon that resists both of its attacking moves, and it could keep Flashing until the police showed up to knock it off. Instead, let's find out if Snorlax can get the job done on its own.

Of course I start by going straight for the Belly Drum, as Aurorus sets Reflect. That works, it's a turn in which damage isn't being dealt, at least...just have to be mindful of the turn it's scheduled to end. Rest kills off three of those turns (one of which featured a Light Screen), and then a Bulldoze for what looks to be in the neighborhood of 75% as Reflect expires. I expect there might be a heal turn next, so order up another Bulldoze (if it did 75% under Reflect, it'll be more than enough without it), but surprisingly, not only is it not in healing range, Aurorus also eschews the opportunity to replenish Reflect, and uses Blizzard down to 98 as it gets finished off by the second hit. 114 after Leftovers.

This level of health is rather troublesome, because I know Goodra is up next, and it's at risk of a KO from Focus Blast. But instead, it picks Fire Blast and misses (not that it matters) while I heal up, then misses a Focus Blast for good measure while Snorlax is asleep. After that it's content to pick Fire Blast for measly damage, and we're golden. Body Slam is a OHKO, and finally the bulkiest team member comes out: Gourgeist. It's not Gengar or Drifloon at least, but it does resist Bulldoze such that it takes several +6 hits to go down, while Body Slam of course does nothing. Luckily, its moveset is rather lacking in coverage, such that I can almost get a trap pivot cycle going. Try as you might with your combo of "Trick-or-Treat to make them weak to my Ghost moves", if you try that on Snorlax all you'll accomplish is turning it into an imitation H-Zorua, and it'll still be immune to those moves.

Rather, the only move it can hit Snorlax with is Seed Bomb, and for that I can switch out to Black Sludge Bulbasaur to take the hits, then switch back to Snorlax to shrug off the Ghost moves and get some more Leftovers. Because I had to spend so many extra Rest PP earlier in the run, I have to do that switch cycle a few times to burn some of the PP, losing the Belly Drum boost in the process. Still, the pivot cycle can't be stopped: I get to throw in a cheeky +0 Bulldoze, hopefully staying above healing range but getting down to a point where one more +6 hit is enough, and eventually the goal of running out all 15 Seed Bombs is complete, immediately after I use up the last Rest PP. Gourgeist can do nothing at this point except spam moves that do nothing, so the rest is a formality: Snorlax wakes up and indeed KOs with one more +6 Bulldoze, Gardevoir comes out last, traces Immunity, and promptly gives that up for Pixilate by mega evolving. No matter what it does, neither Psychic nor Moonblast can KO even with a critical, and one Body Slam is enough to finish the league with an overall Pokedex seen count of 129.

---

If only it was that easy, but there's still one more challenge to be mindful of! After Hall of Fame registration, we get the victory parade cutscene, and AZ comes up to challenge us to battle. (He wants to know what a "Trainer" is, then promptly gets introduced as "Pokemon Trainer AZ".) Yes, the Pokedex does take this battle into account, but for the first time in a very long time, it's a battle that we can safely lose without consequence. Okay, maybe there is a consequence: if everyone manages to faint to AZ's lead Torkoal, then he never sends out the Golurk behind it, and the consequence is that the Pokedex remains 129 instead of ticking up to 130. So let's do that.

I want Tyrunt to take the fall first, mainly because Torkoal starts out nice and predictable by using Stone Edge, whereas if it runs out of those 5 PP, it risks using moves that could trip the Rocky Helmet. Indeed, after Tyrunt faints, Torkoal proceeds to miss the last two Stone Edges against Crobat, but at this point that's fine. Even after Body Slam paralyzes, Crobat is still faster, but I gladly spam Haze to do nothing while waiting for the damage to rack up.

For everyone else, including the three team members that are weak to Lava Plume, it's a matter of chucking Poke Balls to waste turns, with Snorlax chipping in a Belly Drum do do some of the work for him and provide the man with his first victory in thousands of years. Was it worth the wait? The post-match cutscene pretty clearly answered that for him.

And no, the Floette appearance in that cutscene doesn't count as seen for the Pokedex either.

After Main Game
Central Kalos Seen: 53 (Owned: 7)
Coastal Kalos Seen: 46 (Owned: 1)
Mountain Kalos Seen: 30 (Owned: 2)
Current Team -
2022-02-27_14-58-02.598_bot.png

Crobat L58 (Haze/Acrobatics/U-turn/Fly)
Tyrunt L57 (Earthquake/Dragon Claw/Crunch/Charm)
Snorlax L58 (Body Slam/Rest/Belly Drum/Bulldoze)
Magneton L58 (Thunderbolt/Flash Cannon/Thunder Wave/Flash)
Bulbasaur L58 (Toxic/Leech Seed/Grass Knot/Protect)
Chespin L58 (Leech Seed/Seed Bomb/Pain Split/Confide)

PC Box -
Xerneas L50 (Gravity/Geomancy/Moonblast/Megahorn)
 
To Kiloude and Beyond

Mom's waiting downstairs after the next game load, with some important news: Sycamore wants to see me for some business in Lumiose City. Why he couldn't have taken care of this while we were there at the parade together bewilders even her. It's obviously a "We want to make sure you know where to go next without getting lost" element, for what few organized postgame quests there are.

It's not even the only interruption, as right after I walk out the door, Shauna is there to ambush me with...a trade request. See, she has this Froakie that hatched from an egg (astute players will notice that unlike Serena/Calem, Shauna always gets a female starter, no matter which one it is, so this doesn't require a Ditto) and wants to trade it to me. Hey, at least we already met Froakie back in the very first battle of the game, so no harm done here. She'll take any Pokemon in return...any Pokemon? Well, I've got this Xerneas sitting around in the box for nothing, maybe you'll appreciate it more--here you go!

I figure this Froakie can permanently hold onto the Lucky Egg for the rest of the game, so I can find out how much experience it gains along the way. As far as the team slot, it can displace my original starter, Chespin, who's been seriously outgunned in the late game by having to stay unevolved, and even Pain Split doesn't alleviate that much.

One noteworthy rule that kicks in now: all grass on every route is unsafe. The first time I get a wild encounter on a route after beating the league, it's rigged to be a 100% chance of the roaming legendary (Articuno in my case), because they want to make sure I have it registered in the Pokedex to track it after that. "They," being the Game Freak design team, are of course held in extreme scorn by Minidex. It shouldn't be a problem since there's nothing more that needs doing anywhere near tall grass, we can just Fly around as needed.

So what does Sycamore want? Oh, he just wants to give me a TMV Pass so I can take the train to the postgame-exclusive town, Kiloude City. In France, the real-life TGV stands for train à grande vitesse, so what could TMV be...train à mega vitesse? Fueled by something that's not worth thinking about? I only have to take it once regardless, then the new city is tagged for Fly and I can use that to go back and forth. Oh, and Sina and Dexio are also around to give me the national Pokedex mode, allowing all three areas to be grouped into one combined listing. Not only that, but if we should encounter Pokemon over the rest of the game that don't belong to any region (hint, hint), I'll be able to keep proper tabs on them from within the game, unlike in Alola where these entries could only be probed with an external save reader.

The relevant thing here is the last Calem battle, but...the north end of town is empty at first. Turns out I need to play at least one battle at the Battle Maison before he appears. I get to choose from any of the normal courses, with opponents using NFEs, and really a team of Crobat/Magneton/Snorlax shouldn't have any trouble winning one battle against that. The first trainer shows up with Hoothoot, Pansear, and Glameow, none of which have been previously seen, but fortunately the Battle Maison is just like every other battle facility in that the Pokemon don't get registered to the dex.

Now that this box has been checked, I can suspend the streak at 1 win, leave the house, and...surprise, look who finally showed up? Calem's introductory speech mentions "My new partner can do something that'll really surprise you!" which...color me skeptical, but let's go. The start of the battle is still as familiar as ever; Meowstic still loves Fake Out, and still doesn't have a Fairy move stronger than Disarming Voice, and even with a 9-level advantage it still falls to U-turn + Crunch after failing to KO Tyrunt with Psychic. Froakie gains 11 levels off this first dose of experience, with several more yet to come. Now, however, instead of Altaria with Dazzling Gleam, Calem can try to take revenge with his new partner: Clefable.

It has Moonblast, and in fact it also has another super effective move in Meteor Mash which it prefers not to use because of the stat and STAB disparity. Is that supposed to be the really surprising thing? Surely he doesn't think I'll be surprised by the presence of Magic Guard if I was hoping to chip it with Rocky Helmet or something? After all, Olympia's Sigilyph already showed us that. Whatever the case, a switch to Crobat and the three-hit combo of Acrobatics, U-turn, and Flash Cannon ends this interlude and, thanks to the changed positioning, makes him go straight to Delphox next. It's over 10 levels up on the entire team, and has a hugely strong Fire Blast which can KO Magneton through Eviolite after just the tiny bit of chip damage it got after U-turning in. In fact, since it can overwhelm almost everyone, I'm going to let it. The key is that it actually has to use one of its Fire Blast PP to do so.

Snorlax is the only thing that can try to withstand this assault, but even there Fire Blast still does over a third, so after 2 hits (with a gratuitous burn on the second one) I have to rest up. Delphox then proceeds to hit two more without missing, and if it could use another Fire Blast which also hit, that would do enough damage to KO. But alas, it doesn't have any Fire Blast PP left, just the weaker Psychic, and that only drops Snorlax to 15 HP giving it time to wake up and immediately Rest again. There's still not enough leeway to do anything else, but now Snorlax can survive 3.5 Psychics after Leftovers, so even the occasional critical is okay as long as it doesn't get two criticals on the same Rest cycle or a stat drop prior to Psychic #9. (A stat drop earlier than that would consign me to throwing more sacks on the altar, and probably also using Bulbasaur's Protect to waste some more turns.) Fortunately, we get through three more Rest cycles to run Delphox out of PP on that move too, and the only other move it has is the harmless Shadow Ball, so Snorlax has successfully weathered the storm (to think, it would have been that much easier if one of those bouts of overworld rain had struck Kiloude, or if Snorlax had Thick Fat as its ability) and can now set up into its own juggernaut. Opponents in gen 6 don't make PP-stall switches like they do in 7 when they've run out of all effective moves, so Delphox continues to throw out 0-damage Shadow Balls through a couple more quick naps. Incidentally, one of the benefits of finally playing 5 during the run's hiatus is that I can report on the AI behavior there: in 5, PP stall switches from the AI can happen if you blank all the opponent's moves with Wonder Guard and they have something in the back that's not just as easily blanked, or if you manage to Choice-lock them into a useless move, like a setup move. If they just naturally run out of all their useful moves but still have some useless ones left, then it works the same way in Unova as it does in Kalos: sucks to be them.

Now it's finally showtime, and the rest of the battle is hilariously easy. Delphox, down to +6 Bulldoze. Jolteon now has Thunder but gets cast aside just as easily. Altaria's Dragon Pulse, pathetic. Finally, Absol gives up its Super Luck by mega evolving, which trades away 75% of its Night Slash critical chances for a slightly increased attack stat, but in the heat of the moment all it can think to do is Swords Dance which doesn't do a lot of good when there's someone that already has the equivalent of 3 Swords Dances bearing down with a huge Body Slam. Maybe that Mega Evolution was supposed to be the think he was talking about really surprising me with, but Absol is hardly a "new" partner...he's had it since all the way back at Glittering Cave. For what it's worth, Froakie went up 25 levels (to 30) over the course of the battle and has to have its evolution cancelled, while Tyrunt only gained one level but now that evolution can go through at long last, giving it more speed, more bulk, and even more attack, not to mention Head Smash which it can use to punch holes proactively into what we hope is a lot more stuff than it could go against before.

Beating Calem for this last time causes him to give away a spare Absolite (fat lot of good that does), and for whatever reason, it also causes Sycamore to appear by the Anistar sun dial. This next postgame errand is relevant because he upgrades the Mega Ring, which doesn't affect the mega evolutions I can use with it, but does kick off a scavenger hunt where I get one hour each day to look for hidden mega stones.

I don't particularly need any mega stones right now, but it's still good to get that out of the way because just by having the conversation, the next trip to Lumiose City greets me with a Holo Caster message, talking about something called the "Looker Bureau" that's just opened, and with it the bulk of the postgame missions. Chapter 1 is just a matter of finding some tickets in landmarks around the city, nothing interesting there.

Chapter 2 brings the first battles of the quest, as I have to come across some kids hanging out in an alley. For reference, the league that I've already had to get through sits at level 63-68, and the last Calem battle (another prerequisite to unlocking the Looker Bureau) was at 66-70, but these kids are still using Pokemon in the 50s. Not even very threatening ones either: Swinub and Bonsly (way to break your own Sturdy by Sucker Punching into Rocky Helmet!), then a solo Igglybuff, then Rapidash-Leavanny-Kingler, and finally a solo Spiritomb which at least has decent stats and type, but Tyrantrum has a field day with all four of them, even OHKOing the Spiritomb with Head Smash for the fun of it. This is where we meet Emma for the first time, along with Mimi the Espurr who has to be rounded up separately (outside of battle, so this wouldn't be enough to count for Pokedex seen, too bad Espurr was already checked off in the first skirmish with Team Flare).

In chapter 3, Looker proves that he actually does get bona fide clients every once in a while, as someone comes in speaking Japanese and complaining that their Pokemon were stolen. Emma has a hunch who the likely culprits are: her gang-mates, so she thinks I should battle them rather than confront them herself. Because after all, my Pokedex is the one that needs to keep taking the hit, doesn't it? Most of their Pokemon have their origins in Unova, which perhaps gives a hint of the gang's origins, as some of them aren't even native anywhere in this game: Mandibuzz, then Pangoro and Bouffalant, and Nix caps things off with Druddigon plus Krookodile. The levels are at least higher than the preschoolers from chapter 2, but still slightly underleveled compared to my team, which is enough to make them pushovers against Tyrantrum, Crobat, and the like. The plot thickens after it's all done: turns out the gang was disappointed about Looker more-or-less adopting Emma, because it meant she was spending less time with them. It would be enough to make you want to go out and steal someone's Pokemon unprovoked, right? No?

There's more trouble stirring up in chapter 4, as Looker calls me right back into the office to mope about how Emma's been gone missing more and more lately. In what's sure to be a completely unrelated note, a lot more Pokemon thefts have been in the news, but someone who's been involved in a gang of juvenile miscreants to the point where they lash out over her taking a break couldn't possibly be involved in that, right? It's just some mysterious stranger wearing a suit that takes on three different disguises. Credit to the level curve here for actually getting back to the kinds of levels we were facing in Victory Road, with some of them touching 60 again. The first run-in with our anonymous thief has them using a presumably stolen Jellicent and Volcarona, which would actually be a pretty respectable size-2 team if they didn't crash right into Tyrantrum's face. That clearly didn't work, so after a hasty getaway she comes back with a different face and a team that looks like it came straight out of Valerie's gym, with Whimsicott, Mawile, and Granbull. Then when even that fails to get the job done, all she has left is a solo Persian, which can only mean one thing: Mimi shows up because it wants to play with the other kitty! It couldn't anything to do with who's in that suit, it clearly has to be about the impromptu cat party.

Alas, the cat party never amounts to anything, and we have to go back to the office empty-handed. Emma ends up coming back save and sound, but once we meet her, there's a very shady figure who also comes in and asks for a battle out of nowhere. He only ends up using Braviary, which is a waste of both time and the dex entry and this point, but apparently that battle was enough to buy us inroads to climb the ladder of scum and villainy.

Or rather, since the Hotel Richissime doesn't believe in making its patrons climb ladders, the elevator will have to do as we set out on the fifth and final chapter. There's a rematch with Malva up here; in a break from traditional postgame rematches, she doesn't have a more powerful team or more Pokemon compared to her Elite Four appearance, and in fact brings only Pyroar which makes things go by a lot quicker. No need to set up Belly Drum or anything against it, just smash heads! Anyway, the reason she wanted to talk to us is that she claims the shocking revelation that the occupant of that power suit, otherwise known as Essentia, is really Emma. But that's absurd--everyone knows you can't spell Essentia without "Entei ass", and one of the people in this room actually uses fire types to play the part! Hmmmm...

Whatever the case, we have to infiltrate Cafe Lysandre again, with the same maze of teleporters and spinner tiles as before. The only differences are the side rooms are now blocked off, and instead of having the maze full of Flare grunts, it has two kinds of trainers: half of them are the Lumiose gang, who show up with the same teams they had in Chapter 3 (just now with a couple extra levels) and are thus totally uninteresting. Luckily, one of them's facing the wall so we can skip that battle, hooray. The rest of the trainers are Scientists who start with that time-honored tradition of turn 1 X items, which makes them easy pickings, but unfortunately the damage was already done when their Pokemon seeped into my dex: Elgyem and Klinklang, then Weezing and thankfully a Heliolisk that's already been seen, and Justus sends out a Muk that will prove to be the final new Pokemon seen during the postgame storyline, bringing the national dex to a rather fitting 150 seen.

After him is the final teleport, which leads to the last gang member, and we already established that they don't use anything new. I could probably do with a heal now, so instead of going all the way out the building...well, I can loop around the floor to get to the elevator and go to the original version of this floor, then from there find the left side room that's not out of order here, and...hey, free bed! Now we should be prepared enough for the final boss of the run.

Rather than an Elite Four, this gauntlet is simply 4 battles against Essentia in a row, and no Entei (or its ass) anywhere to be found. Instead, it's the same standard procedure as the gang-mates: a rehash of the very same battles I fought against last chapter, then the final one uses Pokemon taken from Xerosic's own team during the one time we battled him before. Now they actually have a level advantage for a change, not that makes them any more interesting. There's perhaps one neat dynamic that comes out of it, but that's all: Magneton disposes of the final battle's Crobat because how else could that matchup have possibly gone, retreat to my own Crobat on the extremely predictable Superpower, and...this time I do have U-turn to use in this position but with the boost up, it's already down to a 3HKO. Or so I thought: a lucky critical pierces through the boost and deals about 99%. Hm, maybe there's an opportunity here, as I can react to that unexpected extra damage, and choose to bring in...Bulbasaur, intentionally getting it KO'd by +1 Psycho Cut! The reason for this is so that I could bring out Froakie, who just leveled up to 51 off the experience from Crobat. At 19 levels down, it's weak enough that it gets OHKO'd by any move except Slash, and the +1 boost ensures that even Slash is good enough now. Furthermore, Malamar is faster, because I didn't feel like running Froakie through the ranks of super training before the battle. Not all is lost, though. Ever since that first batch of levels it got from the Calem battle, Froakie has held onto a very significant move: Quick Attack. That's all it needs to wrap up the whole run.

We don't care about these cutscenes that expose the story at the end. They're more meaningful for Emma than for me, as she now has a permanent roof over her head. (In Sun and Moon, the reward for completing Looker's episode is a cool million; fat chance of getting anything close to that payout from him here.) All we really care about is that we're done.

Final Tabulation
Central Kalos Seen: 54 (Owned: 8)
Coastal Kalos Seen: 47 (Owned: 2)
Mountain Kalos Seen: 33 (Owned: 2)
National Dex Seen: 150 (Owned: 12)

Species that were seen, whose next evolution never was (19):
Chespin
Froakie
Fletchling
Pidgey
Kakuna
Surskit
Combee
Bulbasaur
Doduo
Gloom (x2)
Meditite
Machoke
Golett
Weepinbell
Magneton
Igglybuff
Bonsly
Elgyem

Species that were seen, whose previous evolution never was (72):
Braixen
Greninja
Talonflame
Vivillon
Kakuna
Simisage
Pikachu
Wormadam
Gyarados
Pyroar
Lucario
Gardevoir
Florges
Roselia
Delcatty
Venusaur
Charizard
Blastoise
Gogoat
Alakazam
Gloom
Aegislash
Jumpluff
Snorlax
Malamar
Barbaracle
Dragalge
Clawitzer
Starmie
Cloyster
Kingdra
Krookodile
Machoke
Granbull
Jolteon/Umbreon/Leafeon/Glaceon/Sylveon
Probopass
Hariyama
Chimecho
Mr. Mime
Gigalith
Ampharos
Slowking
Exeggutor
Goodra
Weepinbell
Liepard
Mightyena
Trevenant
Gourgeist
Chandelure
Magneton
Avalugg
Beartic
Jynx
Vanilluxe
Abomasnow
Noivern
Banette
Scizor
Altaria
Rapidash
Kingler
Leavanny
Mandibuzz
Jellicent
Volcarona
Whimsicott
Persian
Braviary
Klinklang
Weezing
Muk

Cast of Characters -

2022-02-27_21-32-10.515_bot.png


1. Chespin "Greenthorn" ♂
Met: Aquacorde Town, level 5
Final level: 58
Relaxed nature
Ability: Overgrow
IVs: 20-18-9-3-8-24
EVs: 156-145-108-1-60-40
Moves: Leech Seed, Seed Bomb, Pain Split, Confide

Almost a forced choice, due to the bottleneck of having to beat Viola at its level.


2. Bulbasaur "Divining Pod" ♂
Met: Lumiose City, level 10
Final level: 63
Impish nature
Ability: Overgrow
IVs: 24-27-23-14-12-23
EVs: 108-2-108-176-92-24
Moves: Toxic, Leech Seed, Grass Knot, Protect

This one is a completely forced choice, because of the interaction of being able to lose to Sycamore combined with having one of his Pokemon that we can't help but see.


3. Snorlax "Minidex Fats" ♂
Met: Route 7, level 15
Final level: 63
Sassy nature
Ability: Immunity
IVs: 13-18-0-23-12-20
EVs: 57-153-200-0-100-0
Moves: Body Slam, Rest, Belly Drum, Bulldoze

The spiritual successor to Wishiwashi's spot from the Ultra Sun playthrough, the huge bludgeon for any cases where we might need to through its weight, or base stats, around. As long as the stat isn't speed.


4. Crobat "Fly Detector" ♀
Met: Connecting Cave, level 15
First evolution: level 30
Second evolution: level 43
Final level: 63
Mild nature
Ability: Inner Focus
IVs: 31-5-8-26-9-9
EVs: 126-60-36-0-36-252
Moves: Haze, Acrobatics, U-turn, Fly

...Yeah, if the stat is speed, that's why I went ahead and sought this out.


5. Tyrantrum "Tooth Sayer" ♂
Met: Ambrette Town, level 20
First evolution: level 58 (postgame)
Final level: 63
Mild nature
Ability: Strong Jaw
IVs: 27-30-31-22-1-0
EVs: 48-178-80-0-144-60
Moves: Earthquake, Dragon Claw, Crunch, Head Smash

Well, that postgame evolution certainly changed the profile it played, to say the least.


5.5. Lucario ♂
Met: Tower of Mastery, level 32
Final level: 32
Hasty nature
Ability: Steadfast -> Adaptability
IV: 6-25-16-25-19-31
EVs: 0-0-0-0-0-0
Moves: Power-Up Punch, Swords Dance, Metal Sound, Bone Rush

You barely even count, having been borrowed for only a minute to deal with a forced cutscene and then returned where you belong, but that one minute was evidently enough for the Pokedex to become permanently tainted. Go ask Balloon Boy and his parents how having to do something "for the show" tends to work out.


6. Magneton "Ohm Cookin'"
Met: Lost Hotel, level 37
Final level: 63
Jolly nature
Ability: Sturdy
IVs: 22-2-25-21-9-13
EVs: 200-0-0-150-160-0
Moves: Thunderbolt, Flash Cannon, Thunder Wave, Flash

Even though it couldn't get Volt Switch without a longer binge session at the Maison, it still offers that type synergy I know all too well.


7. Xerneas "X-Diffractor"
Met: Team Flare Secret HQ, level 50
Final level: 50 (traded off)
Quiet nature
Ability: Fairy Aura
IVs: 26-27-31-31-7-31
EVs: 0-0-0-0-0-0
Moves: Gravity, Geomancy, Moonblast, Megahorn

Hopefully Shauna has some use for you, at least.


8. Froakie "Froabble" ♂
Met: Link trade, level 5
Final level: 51
Jolly nature
Ability: Torrent
IVs: 20-20-20-20-20-31
EVs: 5-37-9-15-7-46
Moves: Substitute, Bounce, Hydro Pump, Quick Attack

The undeniable champion by one measure, anyway: 100% of the moves it ever used resulted in a battle-ending KO. No wonder its final stage is so highly regarded. Pity for Minidex that no one ever used a Frogadier, then! But good news for keeping the Pokedex lean and trim.

So that's the run. No question it's less compelling than the previous one, with those must-OHKO totems, and only a couple battles that can ever be skirted by losing. If nothing else, we never have to play Glittering Cave Roulette again, or question what they were thinking with O-Power Stealth.

Really, the reason I still wanted to finish up this run after so long being tabled to the back burner, was so that I had a place to import a team of ribbon collectors without disrupting the purpose of the save file before it was over. Fresh from Bank, we've got...a Crobat and a Magneton, those were already owned of course, so no loss to the dex there. Alakazam and Umbreon, who were at least unlocked as seen together on the same trainer, late in Victory Road--sure, neither of their prevos were, but importing them like this is one way of skirting the issue around getting them! And last...Suicune. Can't do anything about that one, it has to count for a new entry. A symbolic #151, I guess.
 
Last edited:

Users Who Are Viewing This Thread (Users: 1, Guests: 0)

Top